Published
- 16 min read
Using Docker Compose based Python Interpreter in PyCharm
Intro
I was involved with different kinds of Django projects in the past. Back then the standard approach of attaching your debug interpreter is by creating a virtual environment in your python project. We debug using PyCharm at that time. JetBrains has generously gave us free open source license to use the whole suite of JetBrains tools.
However, back then the notion of developing a Django project from inside a container is not so common. We already manage some of our projects as microservices described by a (or several) docker-compose file. To debug with this kind of setup, we are using SSH daemon inside our container. Then we setup PyCharm so that it treats the docker container as a remote interpreter. This is working for quite a long time (almost 5 years). Then finally JetBrains released some supports to allow interpreters inside a docker-compose configuration.
Things didn’t transition smoothly back then. First issue that I remember is that the interpreter forgets all of the environment variables declared in the docker-compose file. Since Django used environment variable to override it’s settings file, this setup were unusable. So we keep doing the old ways, using remote interpreter.
Recent PyCharm version is making it more difficult to set up a remote interpreter. As of now, in version 2020.2, when we set up a remote interpreter, PyCharm implicitly defined deployment configuration. This is not needed if you are using a container, because the files were already mounted there, you don’t need to copy it again using sftp, etc. However the new interface is quite confusing because you can’t disable the setting at first. You are only allowed to delete the deployment configuration after you’ve made the configuration (funny, eh?). I’ve also tried different approach, such as creating the SSH configuration first, then set it as remote interpreter, but still it generate the deployment configuration.
So, fed up with this, I decided to try the docker-compose-based interpreter again. I noticed several improvements:
- You can now include multiple docker-compose recipes (useful for overriding local config on top of production config)
- You are allowed to include an environment file (they fixed the main deal breaker from previous issue)
- You can map local directory with the directory inside container (so that PyCharm knew it was the same thing)
- When you create a Run Configuration, the environment the interpreter use is the one coming from docker-compose. So, you won’t need to redeclare your environment variables again. Hurray!
Requirements
This articles are going to be some sort of hands on labs/workshop. You can skim thru, but it is best if you do it at your own pace.
We are going to assume this basic understanding of technical skills:
- Git and how to use it to clone project from Github
- Docker, Docker-compose, and how to use their CLI
- Linux based environment, or MacOS, or WSL.
- Python and Django basic understanding
- Debugging methods/terminologies
In addition to that, since we are using PyCharm, you need PyCharm Pro Edition to use it’s debugging features.
Usual setup without IDE
In order to demonstrate how PyCharm enhance our development workflow — and not ruining it or conflicting with the current workflow —. I create a small sample repo here so you can see our basic Django setup. My explanations will refer to that repo. Clone the repo to start experimenting on it.
We are going to setup a small microservice based django server. The repo contains two folders django_project and deployment. The deployment folder contains orchestration script to run the project. The django_project is where the actual Django app is located.
To run the project, we (by we, I mean my colleague and myself) usually go into the deployment folder and run make scripts to spin up the server. We don’t have those now since we want to be a bit more technical and dive in. We are going to run docker-compose directly.
docker-compose up --build -d
This is just to warm up docker. We want to build our initial images and see it running. One good rule of thumb to help you later setup production build: Prepare one initial docker-compose that can be run immediately without having to do further customization so developers can easily check the code out.
If you open your browser and navigate to http://localhost/ . You will see the default welcome screen. It will only says Welcome in localhost.
Since using an IDE is a choice, I want to believe that running the project immediately should not depend heavily on the choice of IDE. The developer should be able to run this out of the box.
However, this is a minimal setup. When doing some custom development works, or deployment, you will have to change some deployment configuration. To illustrate this, I’ve prepared a simple template .template.env and docker-compose.override.template.yml.
But before we proceed, shutdown the current stack first, since we are going to change the compose config.
docker-compose down
Copy the file .template.env as just .env. This is docker compose environment config file. When interpolating variables in the docker-compose files, generally the precedence will be:
default value —> env file —> shell environment variables
This means if a variable is defined in the env file but not in the shell, then docker-compose will use whatever value defined in the env file. This is very flexible and support declarative deployment. For example, in the previous docker-compose command, if you look at the basic recipe docker-compose.yml You will see that we have defined environment variable inside django container to take value from the shell with some default value:
       services:
  django:
    environment:
      DJANGO_SETTINGS_MODULE: mysite.settings
      DEBUG: ${DEBUG:-False}
      SITENAME: ${SITENAME:-localhost}
With this kind of variable passing, we can expect that the environment variables are accessible from within Django settings so we can make a fully config based deployment.
Now look at the .env file you just copied.
       COMPOSE_PROJECT_NAME=mysite
COMPOSE_FILE=docker-compose.yml

DEBUG=True
SITENAME=myothersite.test

DJANGO_HTTP_PORT=8080
HTTP_PORT=80
We override some settings. Notably DEBUG variable to become True because we want to enable Django debug mode. You can experiment by changing other variables too. For the top two variables: COMPOSE_PROJECT_NAME and COMPOSE_FILE were docker-compose internal variables. Changing COMPOSE_PROJECT_NAME will change your docker-compose stack namespace (useful to quickly associate which stack with which project). Meanwhile, COMPOSE_FILE can control which docker-compose file are going to be included by docker-compose command.
We are going to create an extra compose file to override some deployment config. Change value into COMPOSE_FILE=docker-compose.yml:docker-compose.override.yml. A useful note worth knowing, if you omit COMPOSE_FILE variable entirely (make it empty value), then docker-compose default behaviour is to look for docker-compose.yml and docker-compose.override.yml if it exists. By the way, the precedence matter. Rightmost file mentioned in the variable will override files on the left.
Now, create docker-compose.override.yml from the template docker-compose.override.template.yml.
You can see the content like this:
       version: '3'
services:
  django:
    command: python manage.py runserver 0.0.0.0:8080
    volumes:
      - ../django_project:/home/web/django_project

  nginx:
    volumes:
      - ./sites-enabled:/etc/nginx/conf.d
Since we are going to be in ‘development mode’, we use django manage.py server. We also mount our local directory so the container will always have latest changes in our files. We also mount nginx config in case we are dealing with production mode settings. You can even add more overrides like environments or ports depending on the need.
Now that we’re ready, spin up the stack (without rebuilding)
docker-compose up -d
You can then check again http://localhost:8080/ . Now it says Welcome in myothersite.test, which is the value of SITENAME that we declared in the .env file. It will also spawn a Django debug server in port 8080 by default. We setup two server like this because Django debug server supports hot reload. So if you change codes or templates, you may want to see the changes immediately. In that case, you can navigate to http://localhost:8080/ to see the changes.
This is as far as our native setup goes without IDE. Basically you do the development in the files in your host machine, but the python and Django server were deployed using container.
One other thing worth mention is how we run unittest. Since Django and Python is in a container, we run Django tests like this:
docker-compose exec django python manage.py test
As you can see, the command becomes very long. That’s why we store Makefile to provide a shortcut command in the deployment directory.
Before continuing the next section, don’t forget to shut down the stack
docker-compose down
IDE Setup Using PyCharm
To see how much PyCharm improve our workflow, using the same repo, open the folder in PyCharm.
Docker-compose setup
PyCharm bundled the docker-compose plugin integration by default. If for some reason you can’t use it, refer to official doc.
Open the docker-compose.yml file in the deployment directory. You will see that the lines are annotated by arrows like this:

You can click the arrow. Click the double arrow in the services: line. PyCharm will deploy that recipe for you. The service tab will appear to let you know that the compose file are deployed.
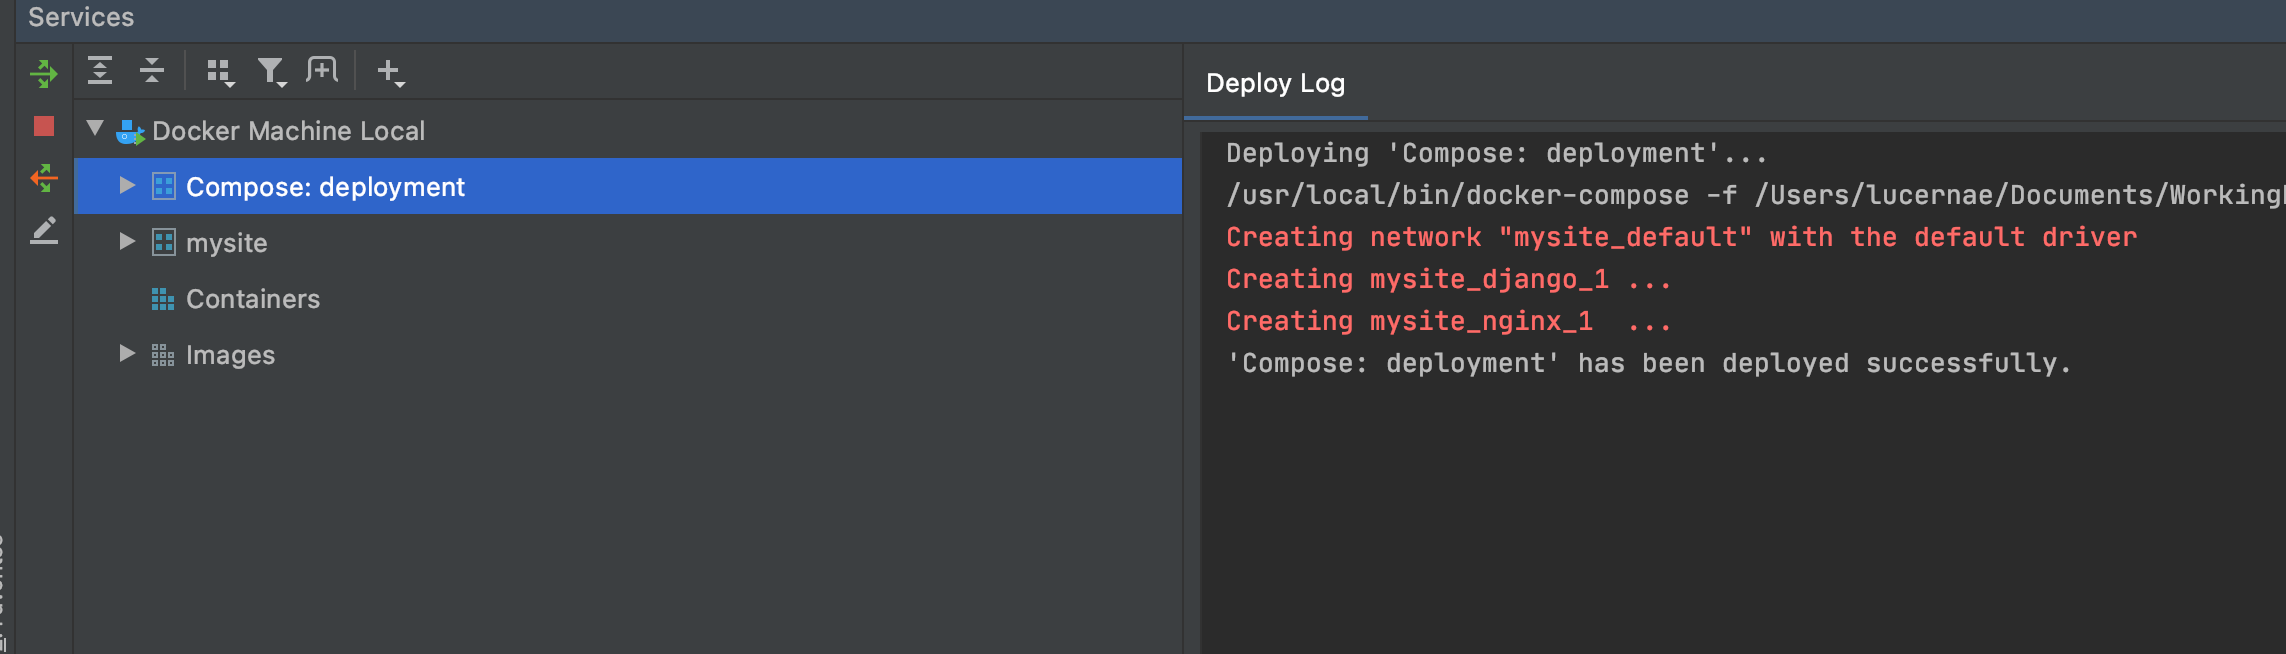
As you can see, it also pick up the COMPOSE_PROJECT_NAME that you specify in .env file. mysite is the name of the stack and you can drill it down to see the services. This tab offer some controls too. You can redeploy, stop, or down the deployment with just a click. Right click the deployment name to see the context menu.
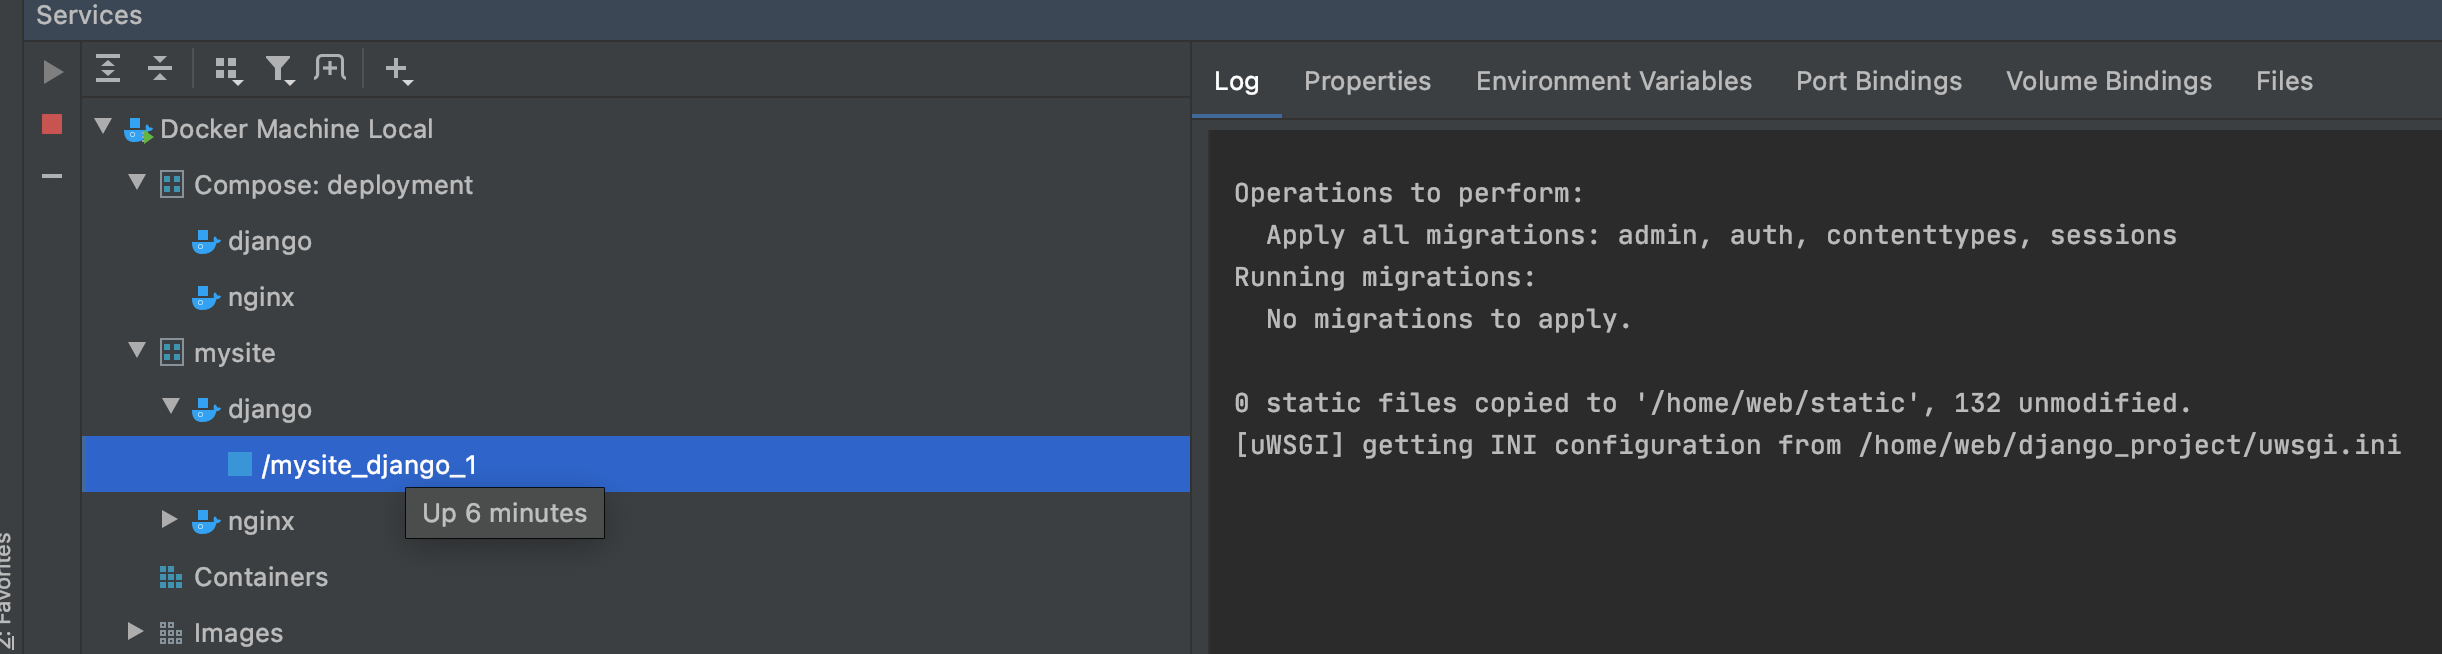
After some sightseeing you will notice that what you deploy (even though it picks up .env file) is only the recipe from docker-compose.yml file. It is evident if you see the service log of django, it shows uWSGI running and not Django debug server.
So, edit the PyCharm configuration. You can do it from the deployment context menu then Edit Configuration, or deployment configuration bar on the top menu. Basically add the file docker-compose.override.yml in the Compose files field. So you will have something like this:
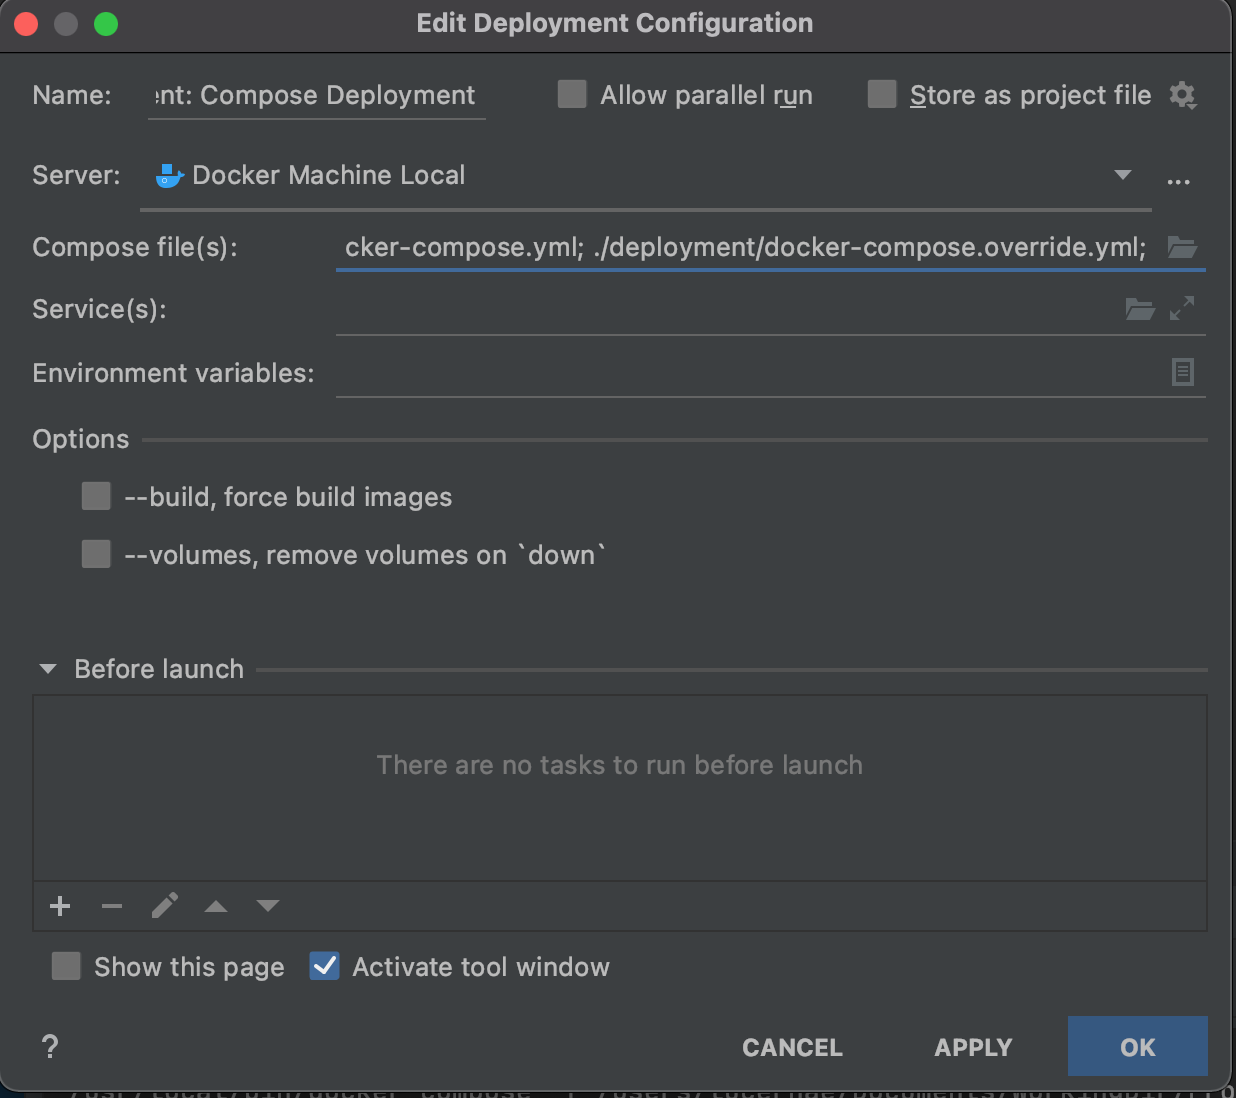
Now you can spin up/down your deployment stack with just a button click from your Services tab. By clicking deploy, you can update your stack deployment and recreate a fresh service. It is now running using Django Debug Server.
It’s quite convenient now to edit your docker-compose file and apply the changes to the deployment.
In a typical development session, you mostly run the deployment once, do some coding, and then validate it and maybe do some debugging. So we are going to set up that workflow too.
Python interpreter setup
We first setup the Python Interpreter.
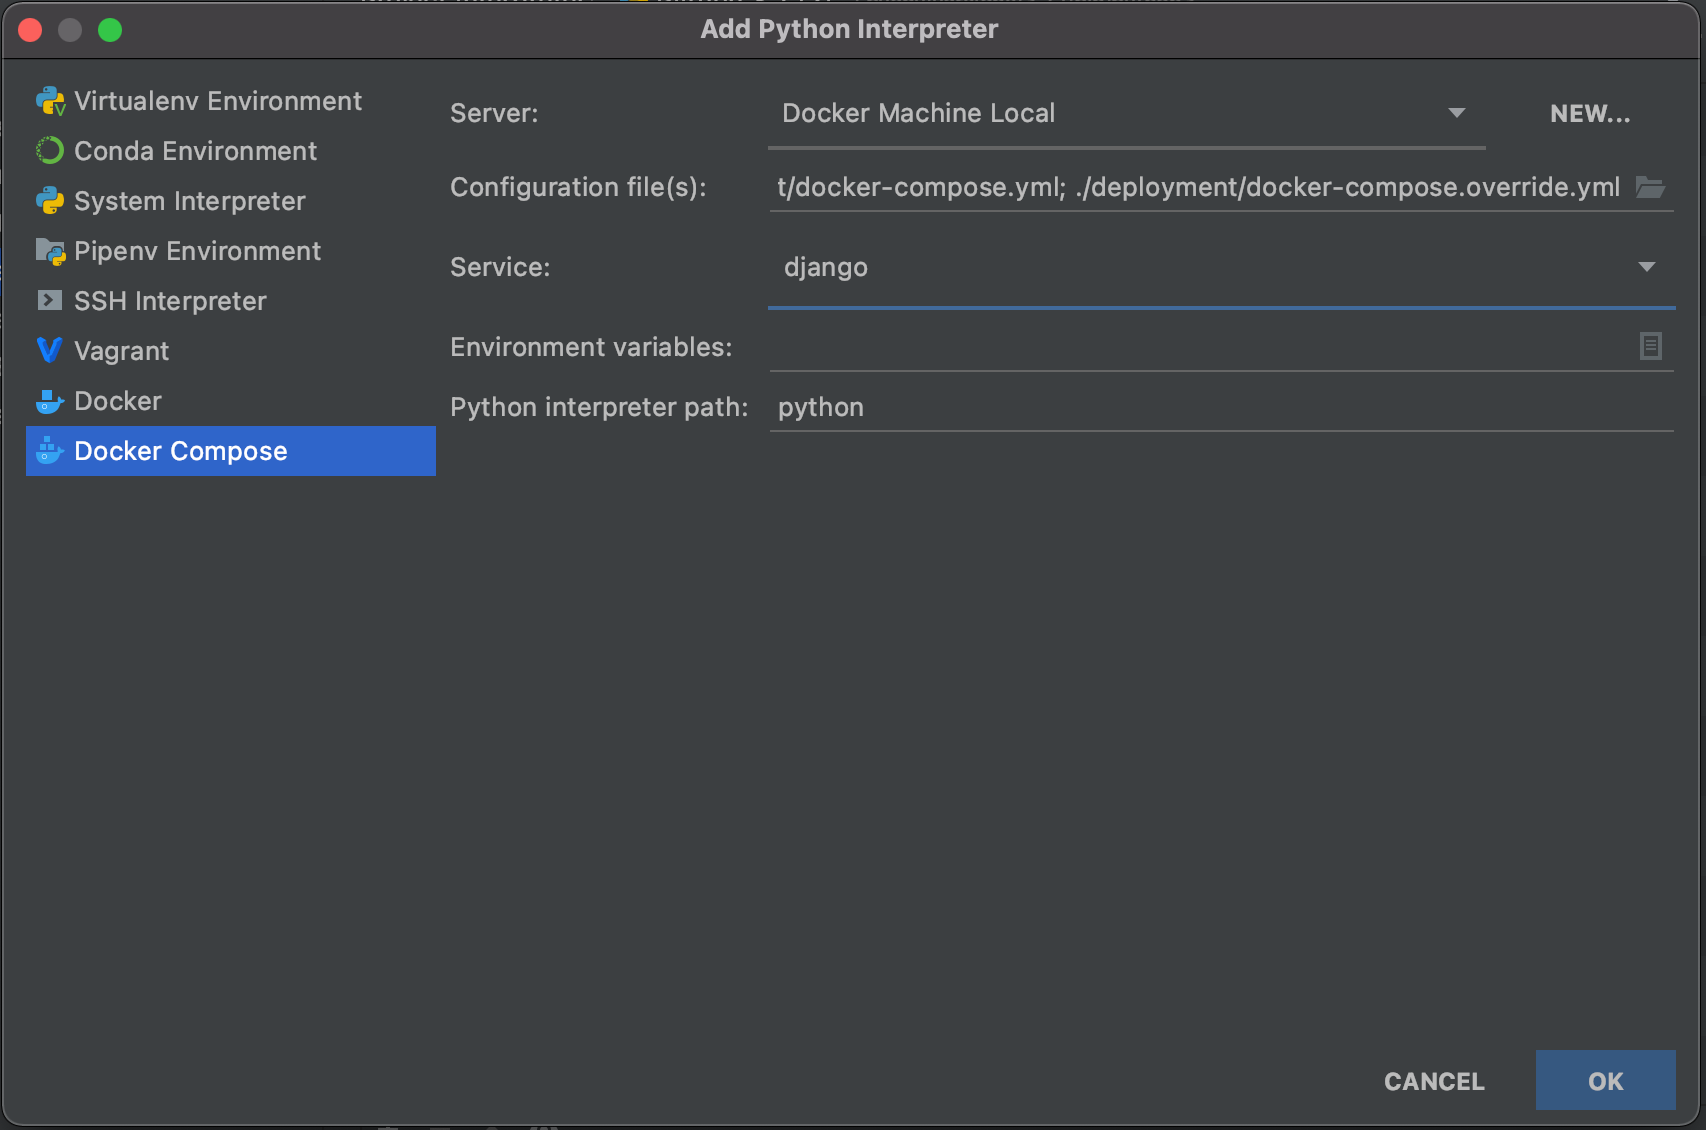
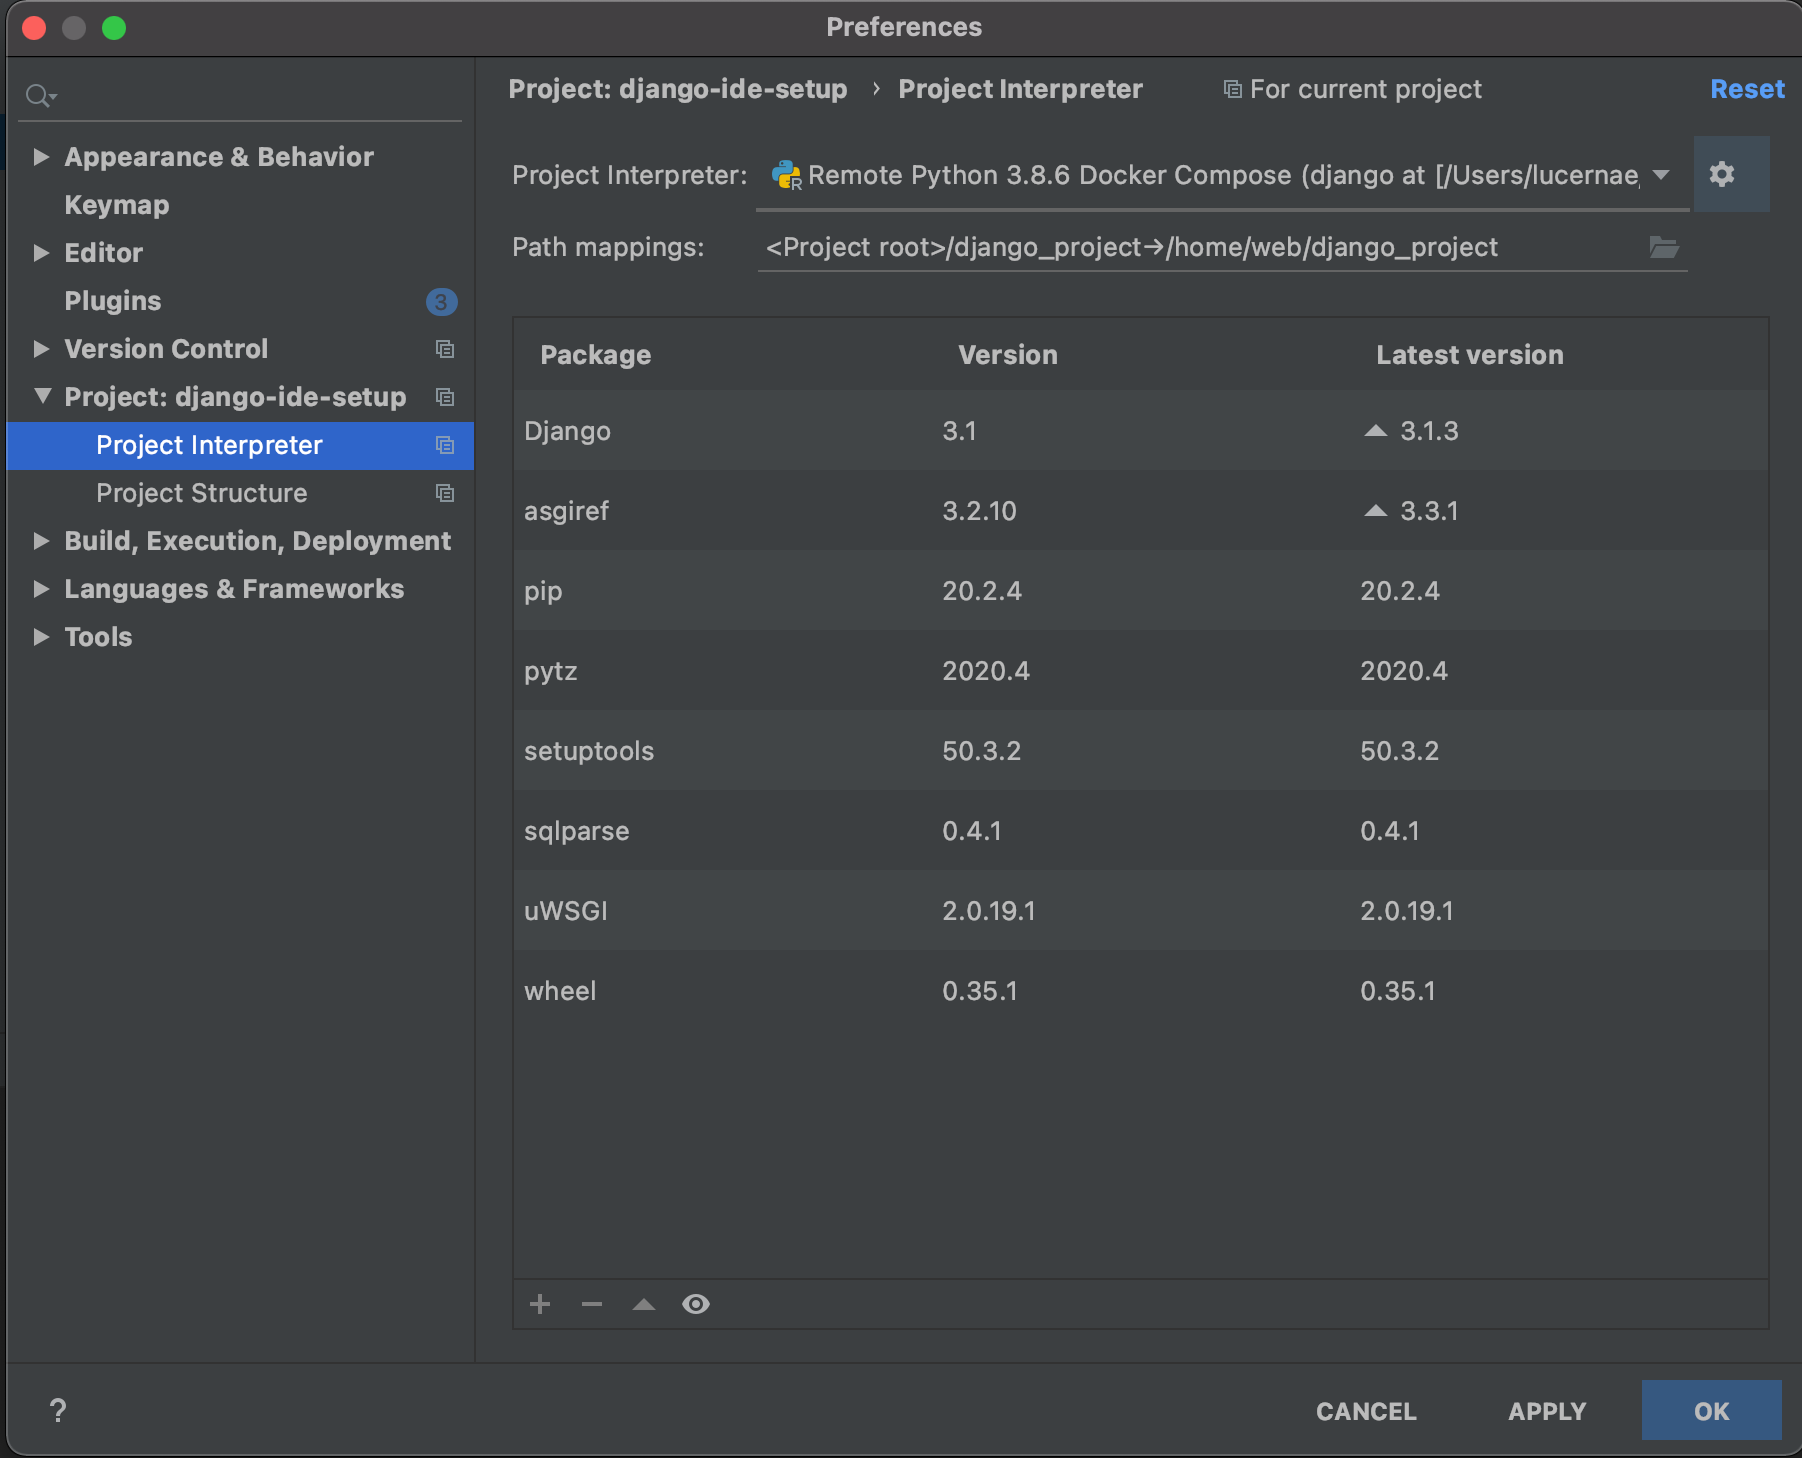
Open PyCharm Project settings, then navigate to Project Interpreter. Click the gear icon and click Add. You will be given several options to select the source of your interpreter. Choose docker-compose. Fill in the settings, which consists of Configuration file(s) (Put docker-compose.yml and docker-compose.override.yml in that order), and the service (Pick django). It should looks like in the image below. Click OK.
It might take some times for PyCharm to build it’s custom images (with pycharm helpers inside the containers).
Next, you want to set project path mappings. The location of codes in your repo in your host computer are different with the locations inside the container. That’s why PyCharm needs to know it. Specify this project path mappings. In our case we map django_project into /home/web/django_project inside the container. This is as reflected in the volume declarations of our docker-compose.override.yml. In your own project, you need to decide by yourself what are the paths that needed to be mapped out, because it can be more than one.
Screenshot below can be used as visual guide:
Once you are done, click OK. Wait a bit for PyCharm to build the helper skeletons. Once it’s finish rebuilding, you can click Python Console tab to load the python console in PyCharm. This is the same Python interpreter that Django will use. You can also check that the variables from .env file carried over nicely as seen in the screenshots:
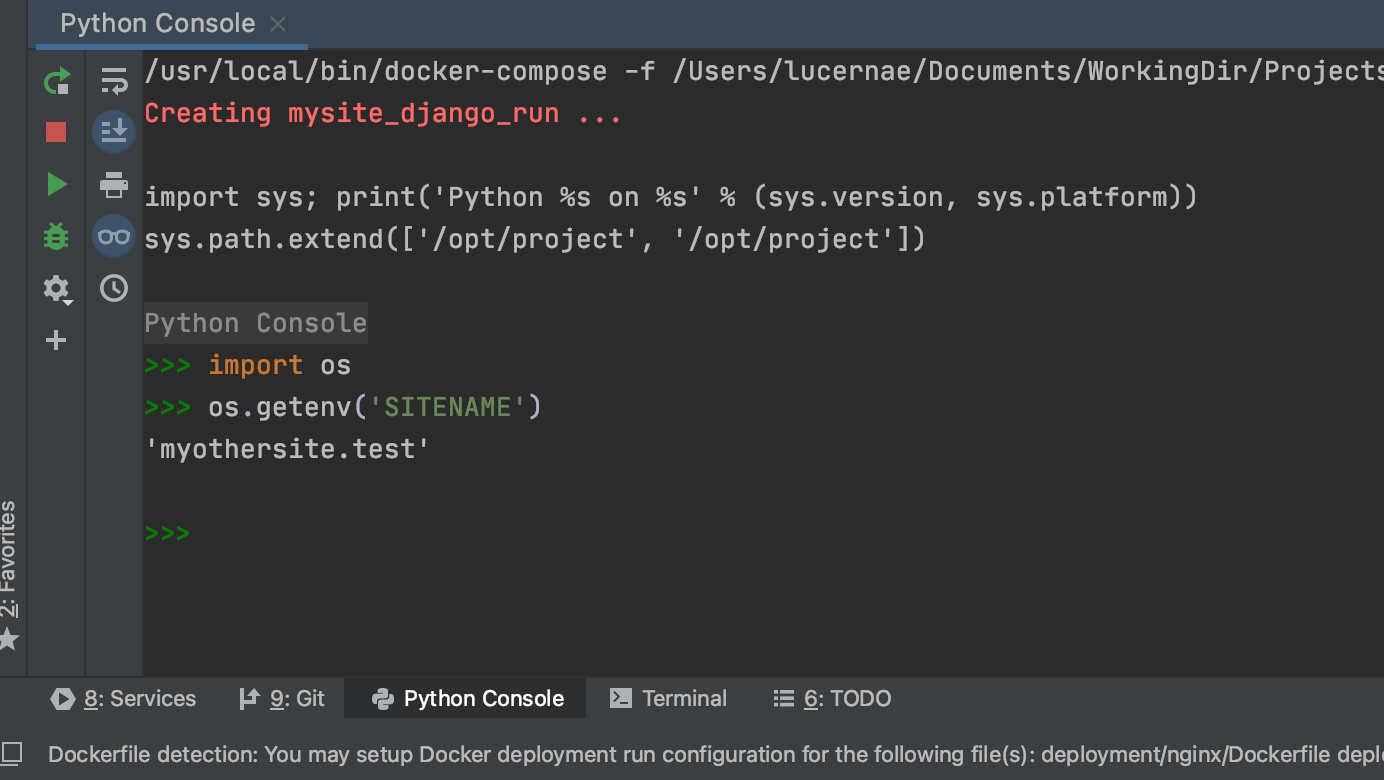
Note that this is a Python interpreter, not Django shell. To use Django, you need to enable Django integration.
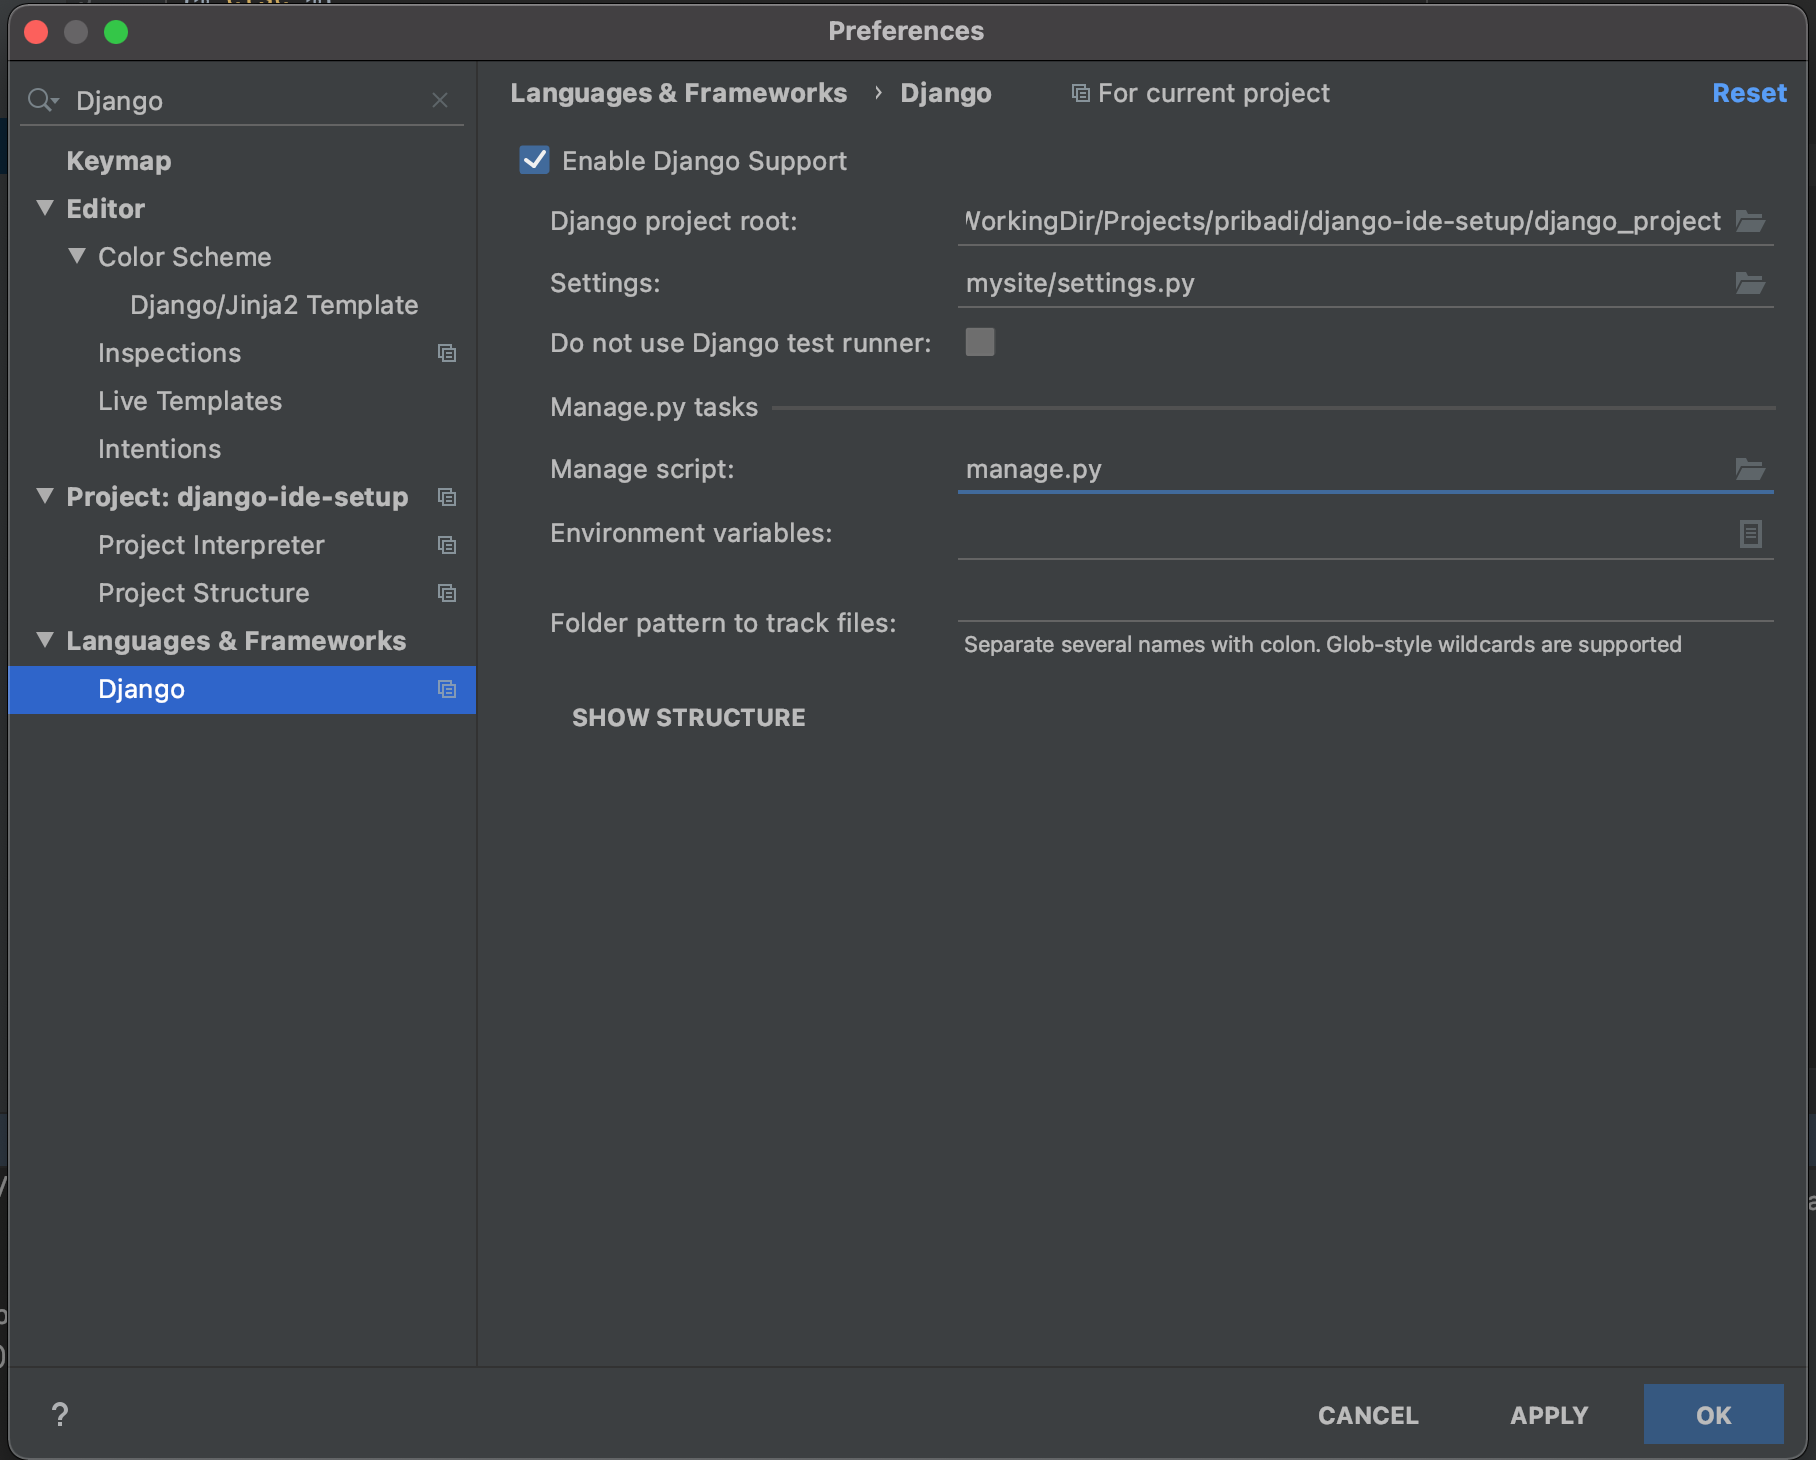
Open Project Settings again, type Django in the search bar**.** In the Language and Frameworks menu, select Django. Enable Django Support. Fill in all relevant information for your project. In our example, the Django project root is in django_project directory, and the settings module is in mysite.settings. See screenshot below for reference:
After setting this up, whenever you navigate to the Python Console, you will get Django Console instead:
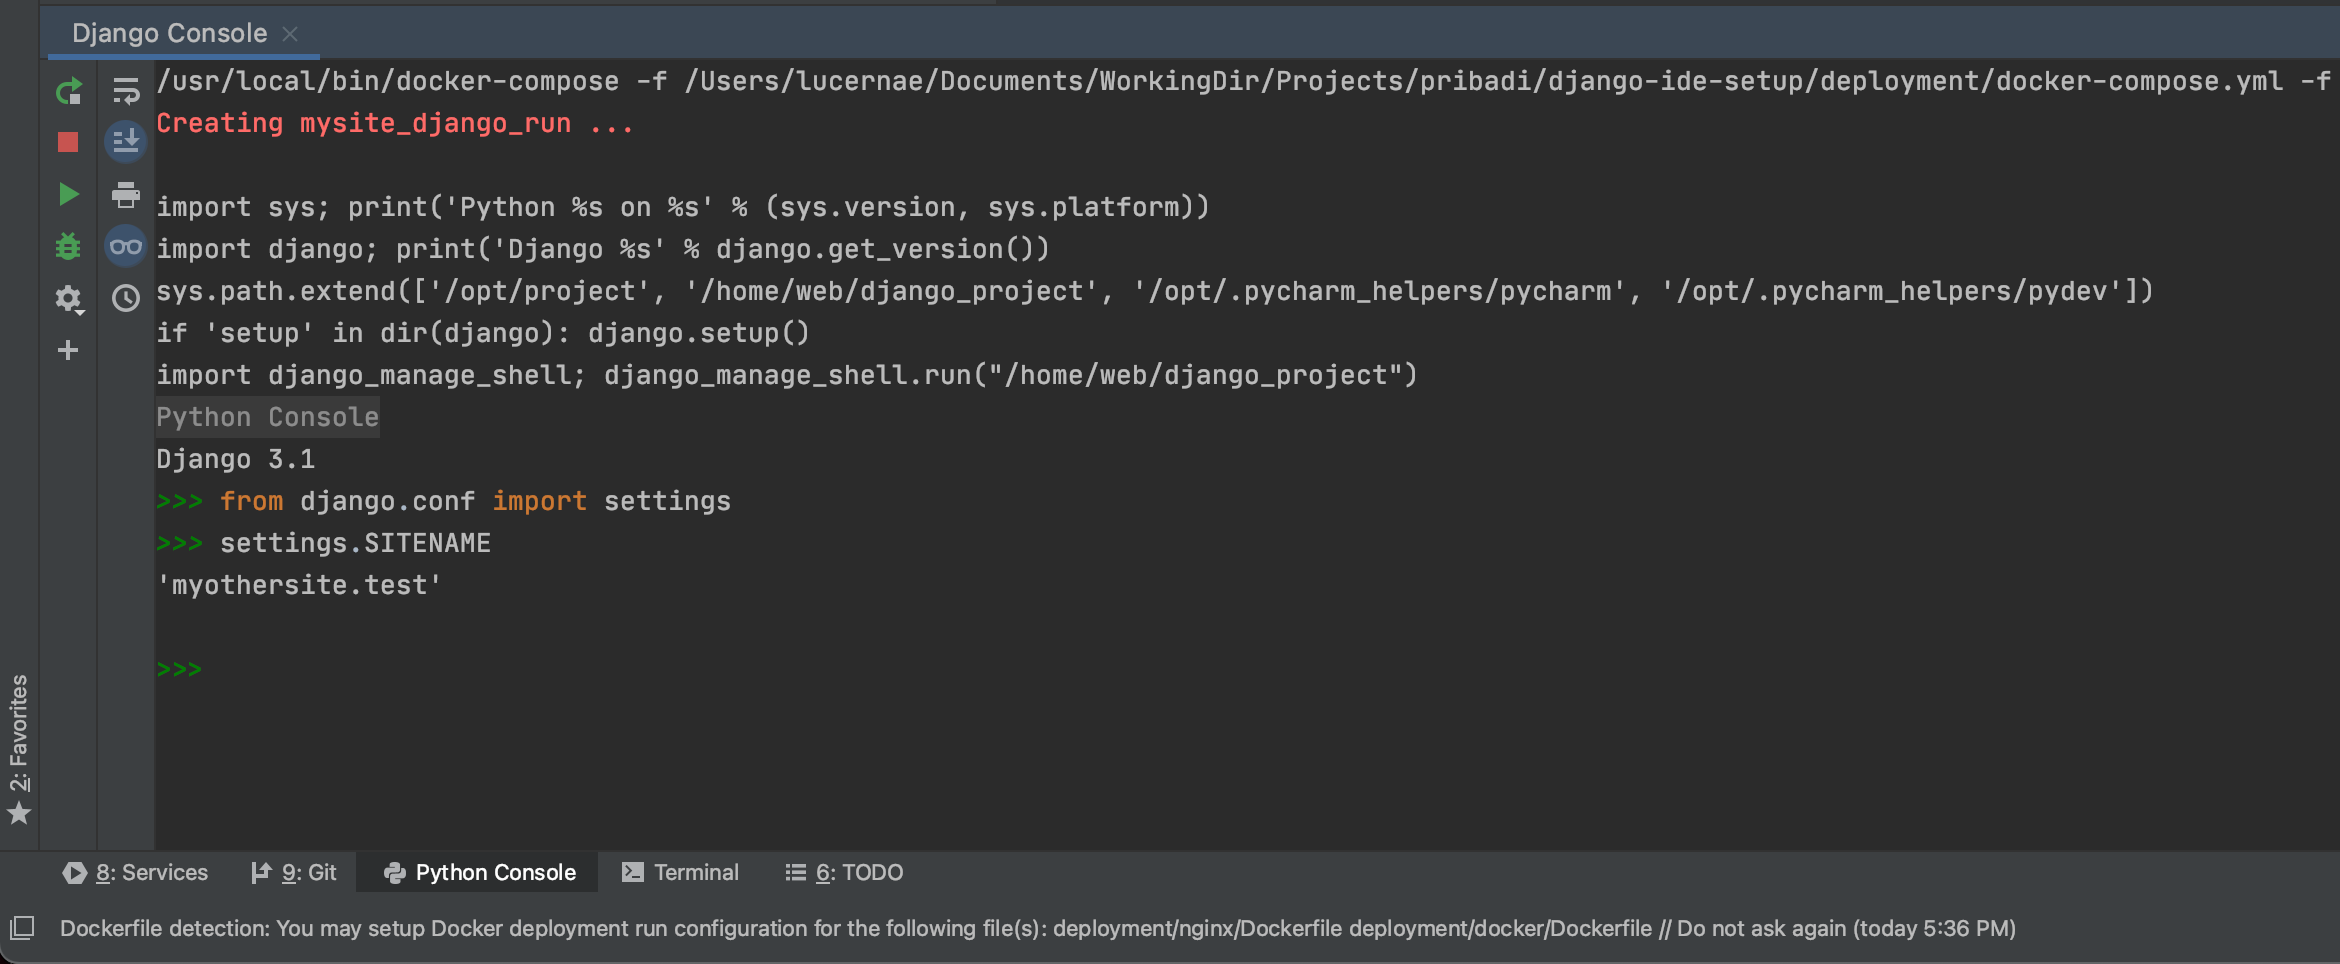
It’s the same thing you get from running docker-compose exec django python manage.py shell. Isn’t that sweet? As you can see, the settings file and environment variables from .env are properly loaded and evaluated as Django settings.
Django debug server setup
Now, let’s step up further and create a Django server run configuration.
Mark django_project directory as a Source Directory by right clicking the directory and select Mark Directory as > Sources Root . If it’s not detected already, mark the django_project/mysite/templates directory as Templates Folder. You will now be able to activate code completions in that folder.
To create a new Run/Debug Config (for Django now), click the Configuration selector, or navigate from menu Run > Edit Configuration. As you can see, you already have docker-compose run configuration. We now want to add Django run config. Click the + button and choose Django Server. Most of our config resides in .env file. So we don’t actually need to modify anything else here besides the target server address to match the port that we expose to in the container (currently 8080). See the screenshot for reference:
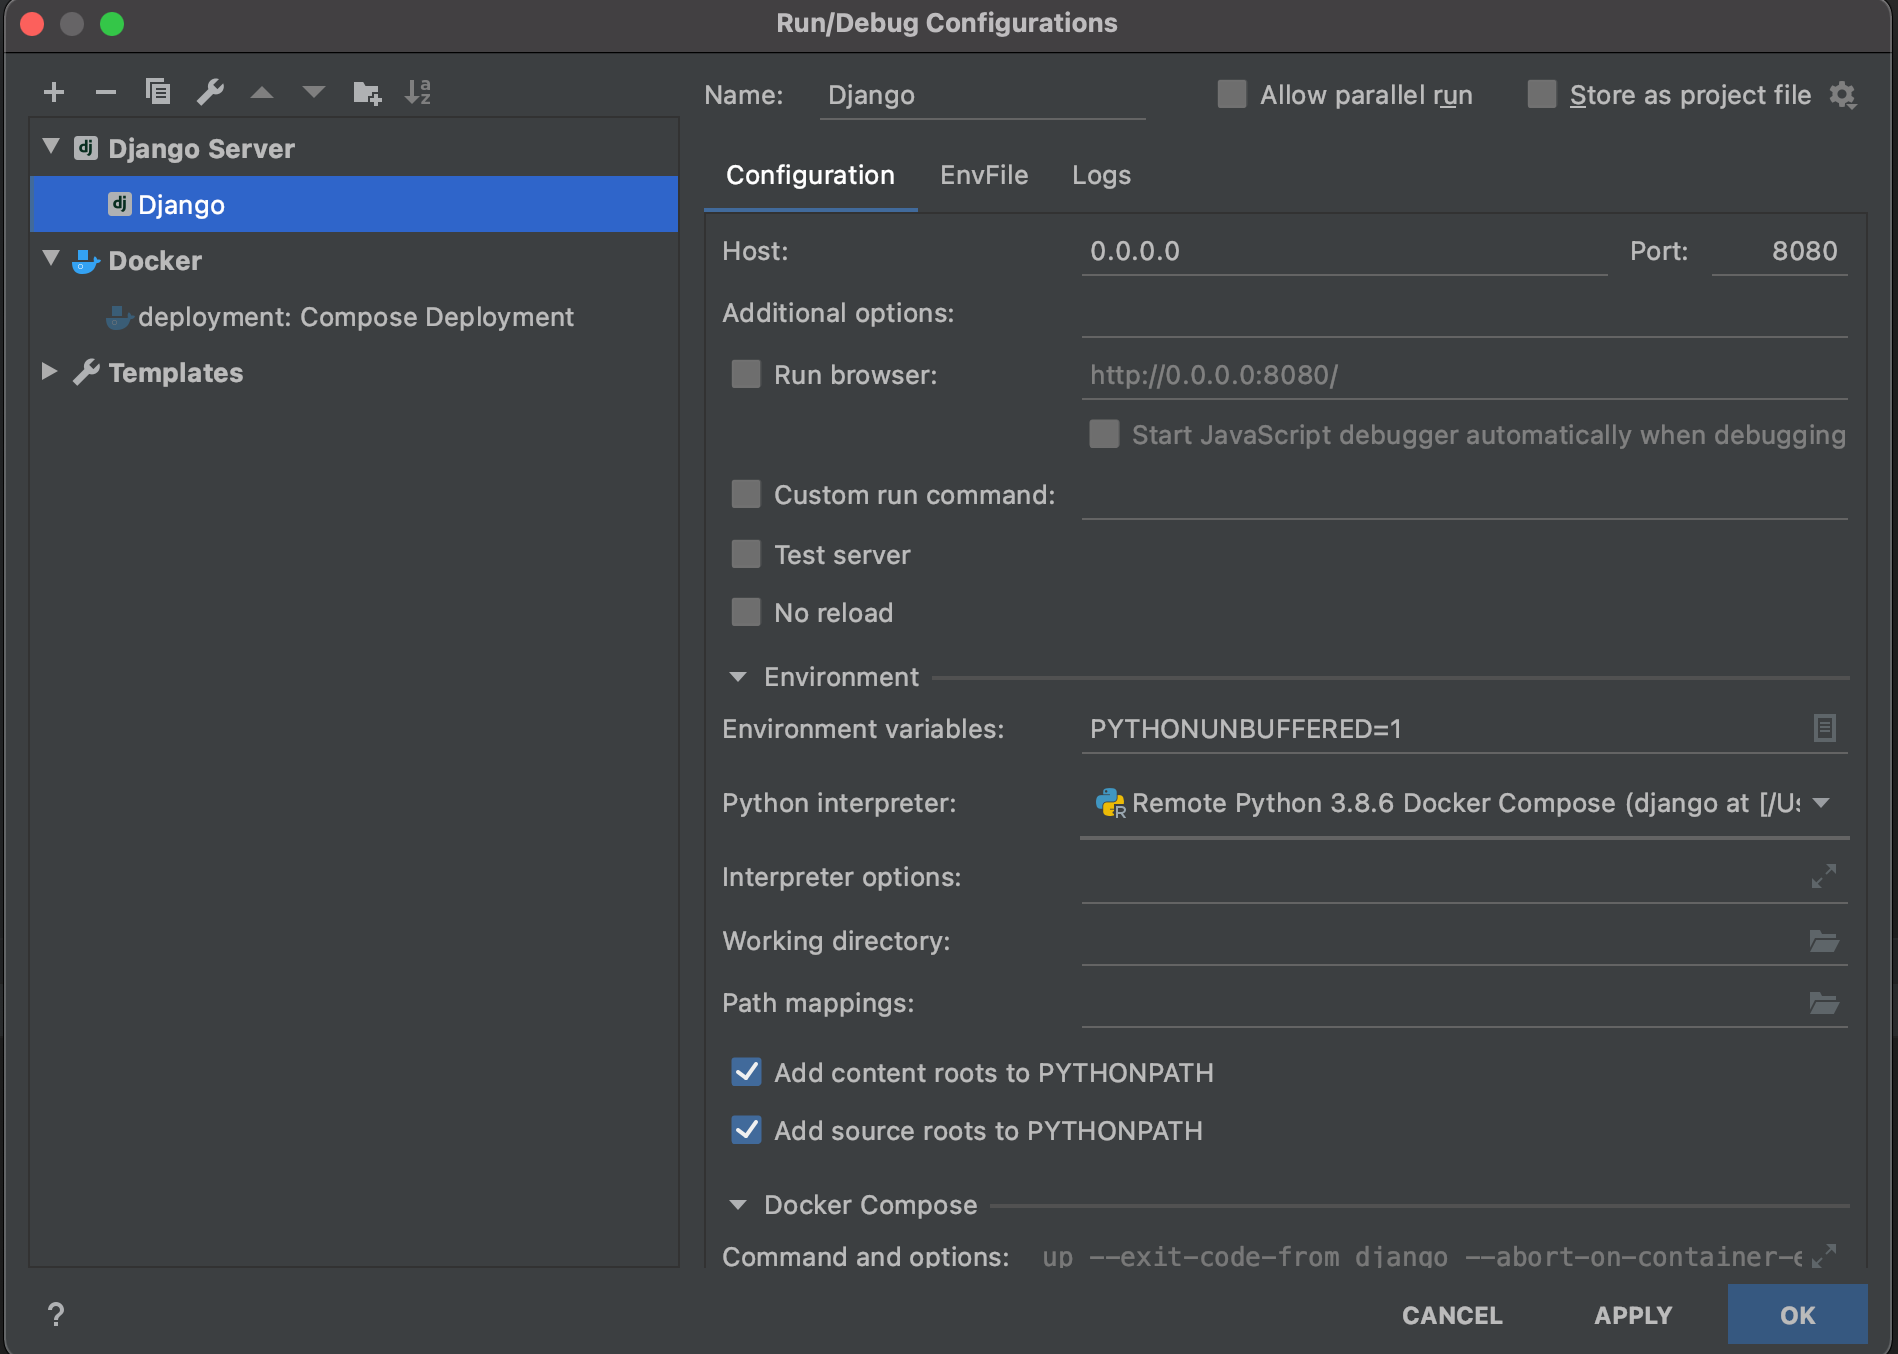
Click OK. Then you can click the Run Button with Django config selected (or whatever the name you gave for the config in previous step). Run button will run the Django Debug Server as usual, meanwhile Debug button will attach PyCharm debugger to Django. Let’s check what Debug button do.
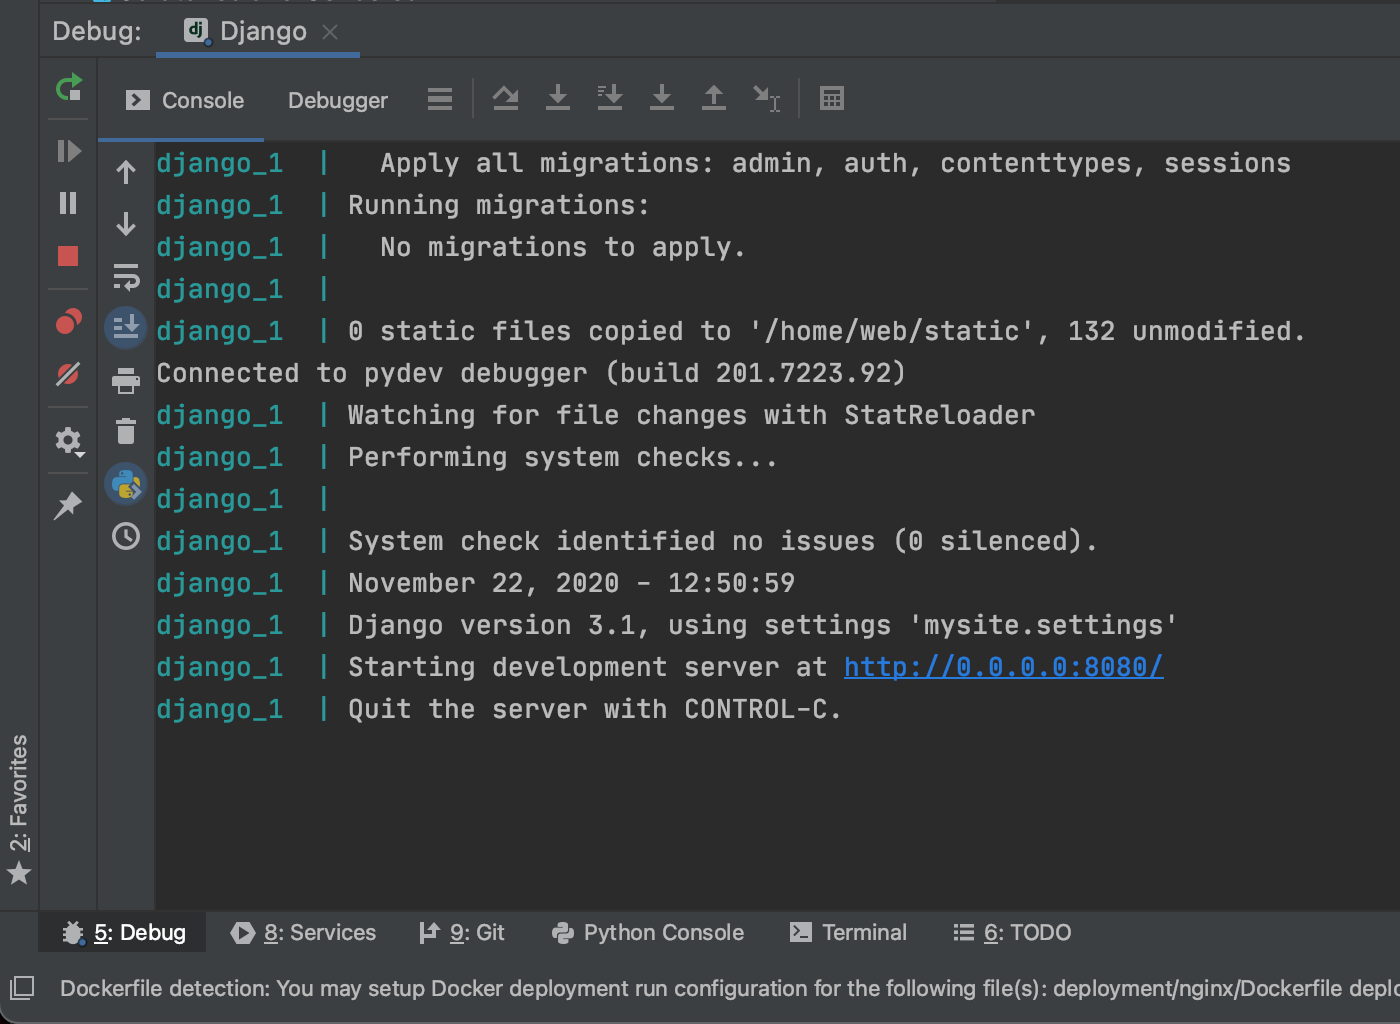
Debug mode panel will show up after you click Debug button. It basically recreates service to attach debugger. You can also see the log in that panel, which is nice because you don’t need to go inside the container to see that now.
As with any debugging session, you can attach breakpoint to any of your python code in the sources folder. With PyCharm you can even attach breakpoint in the template! You can debug in realtime when the template is currently rendered. This is such an awesome features. Here’s what it looks like when you are currently debugging Django Template:
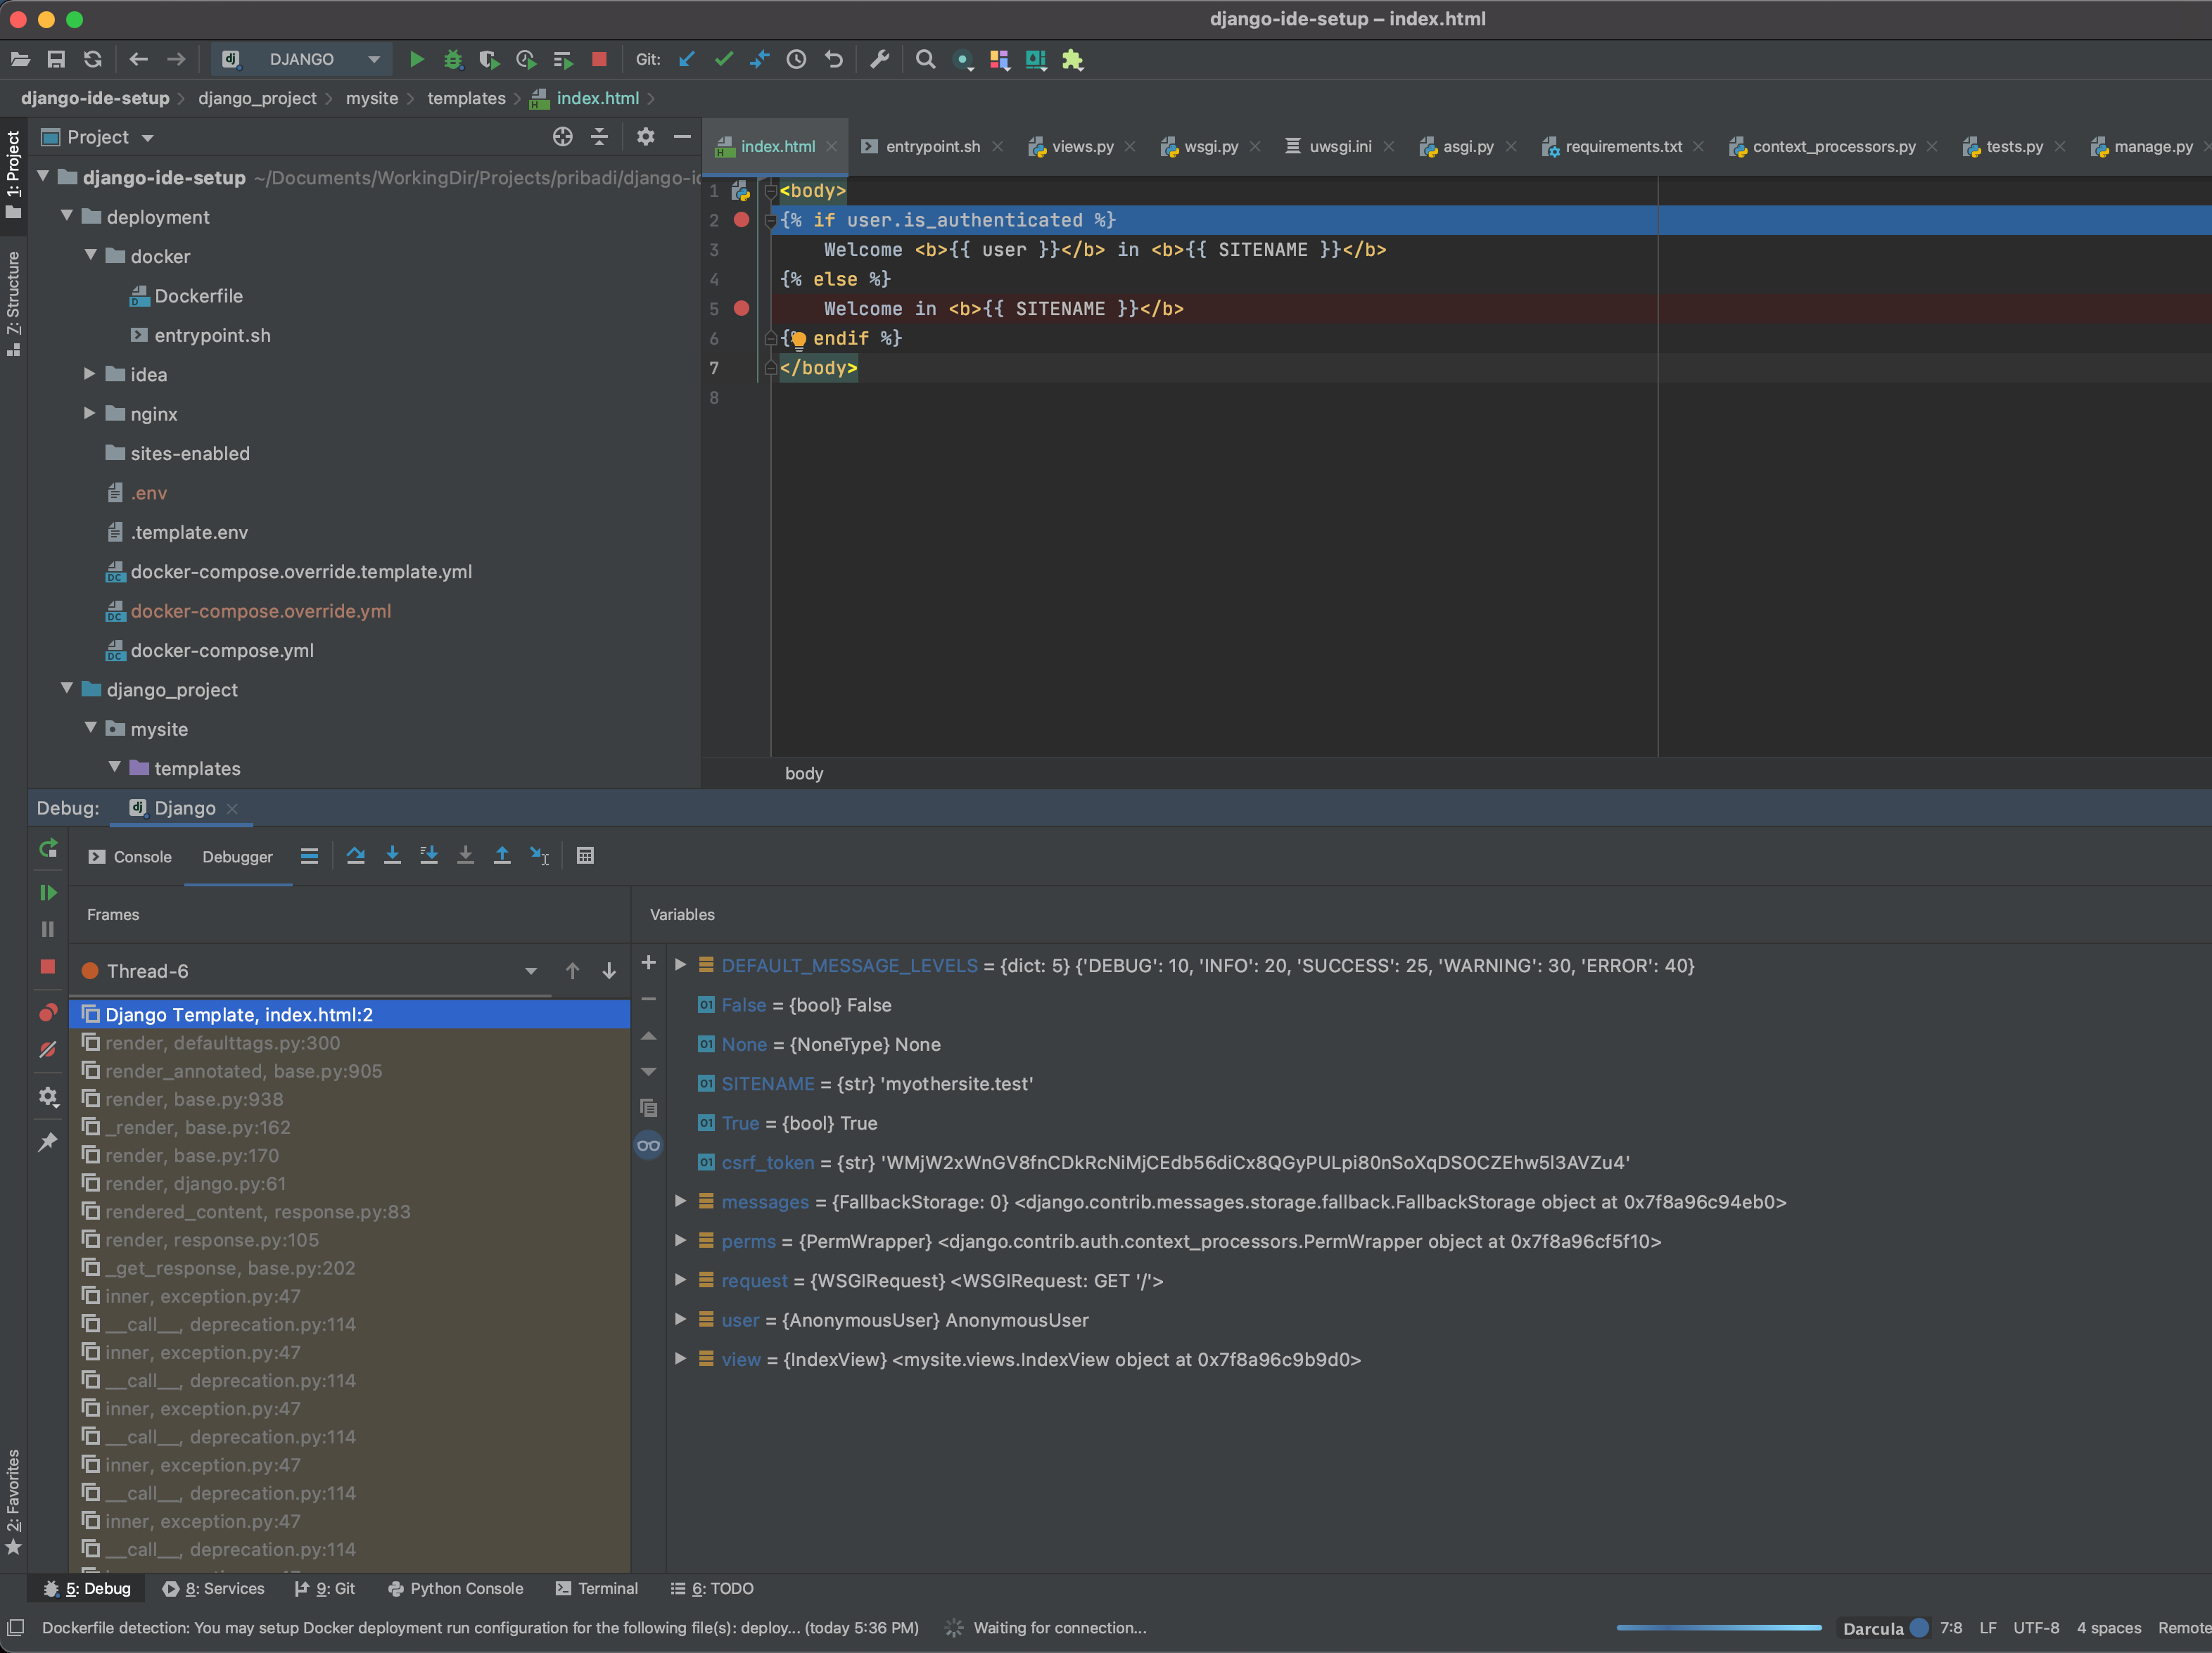
You can do many things in this mode, such as inspecting variables and so on. If for some reason this template debugger doesn’t work for you, check out the documentation and make sure that you set the current template language to be Django instead of Jinja.
Test runner setup
Then, the next tips that I would like to add is about running Django test.
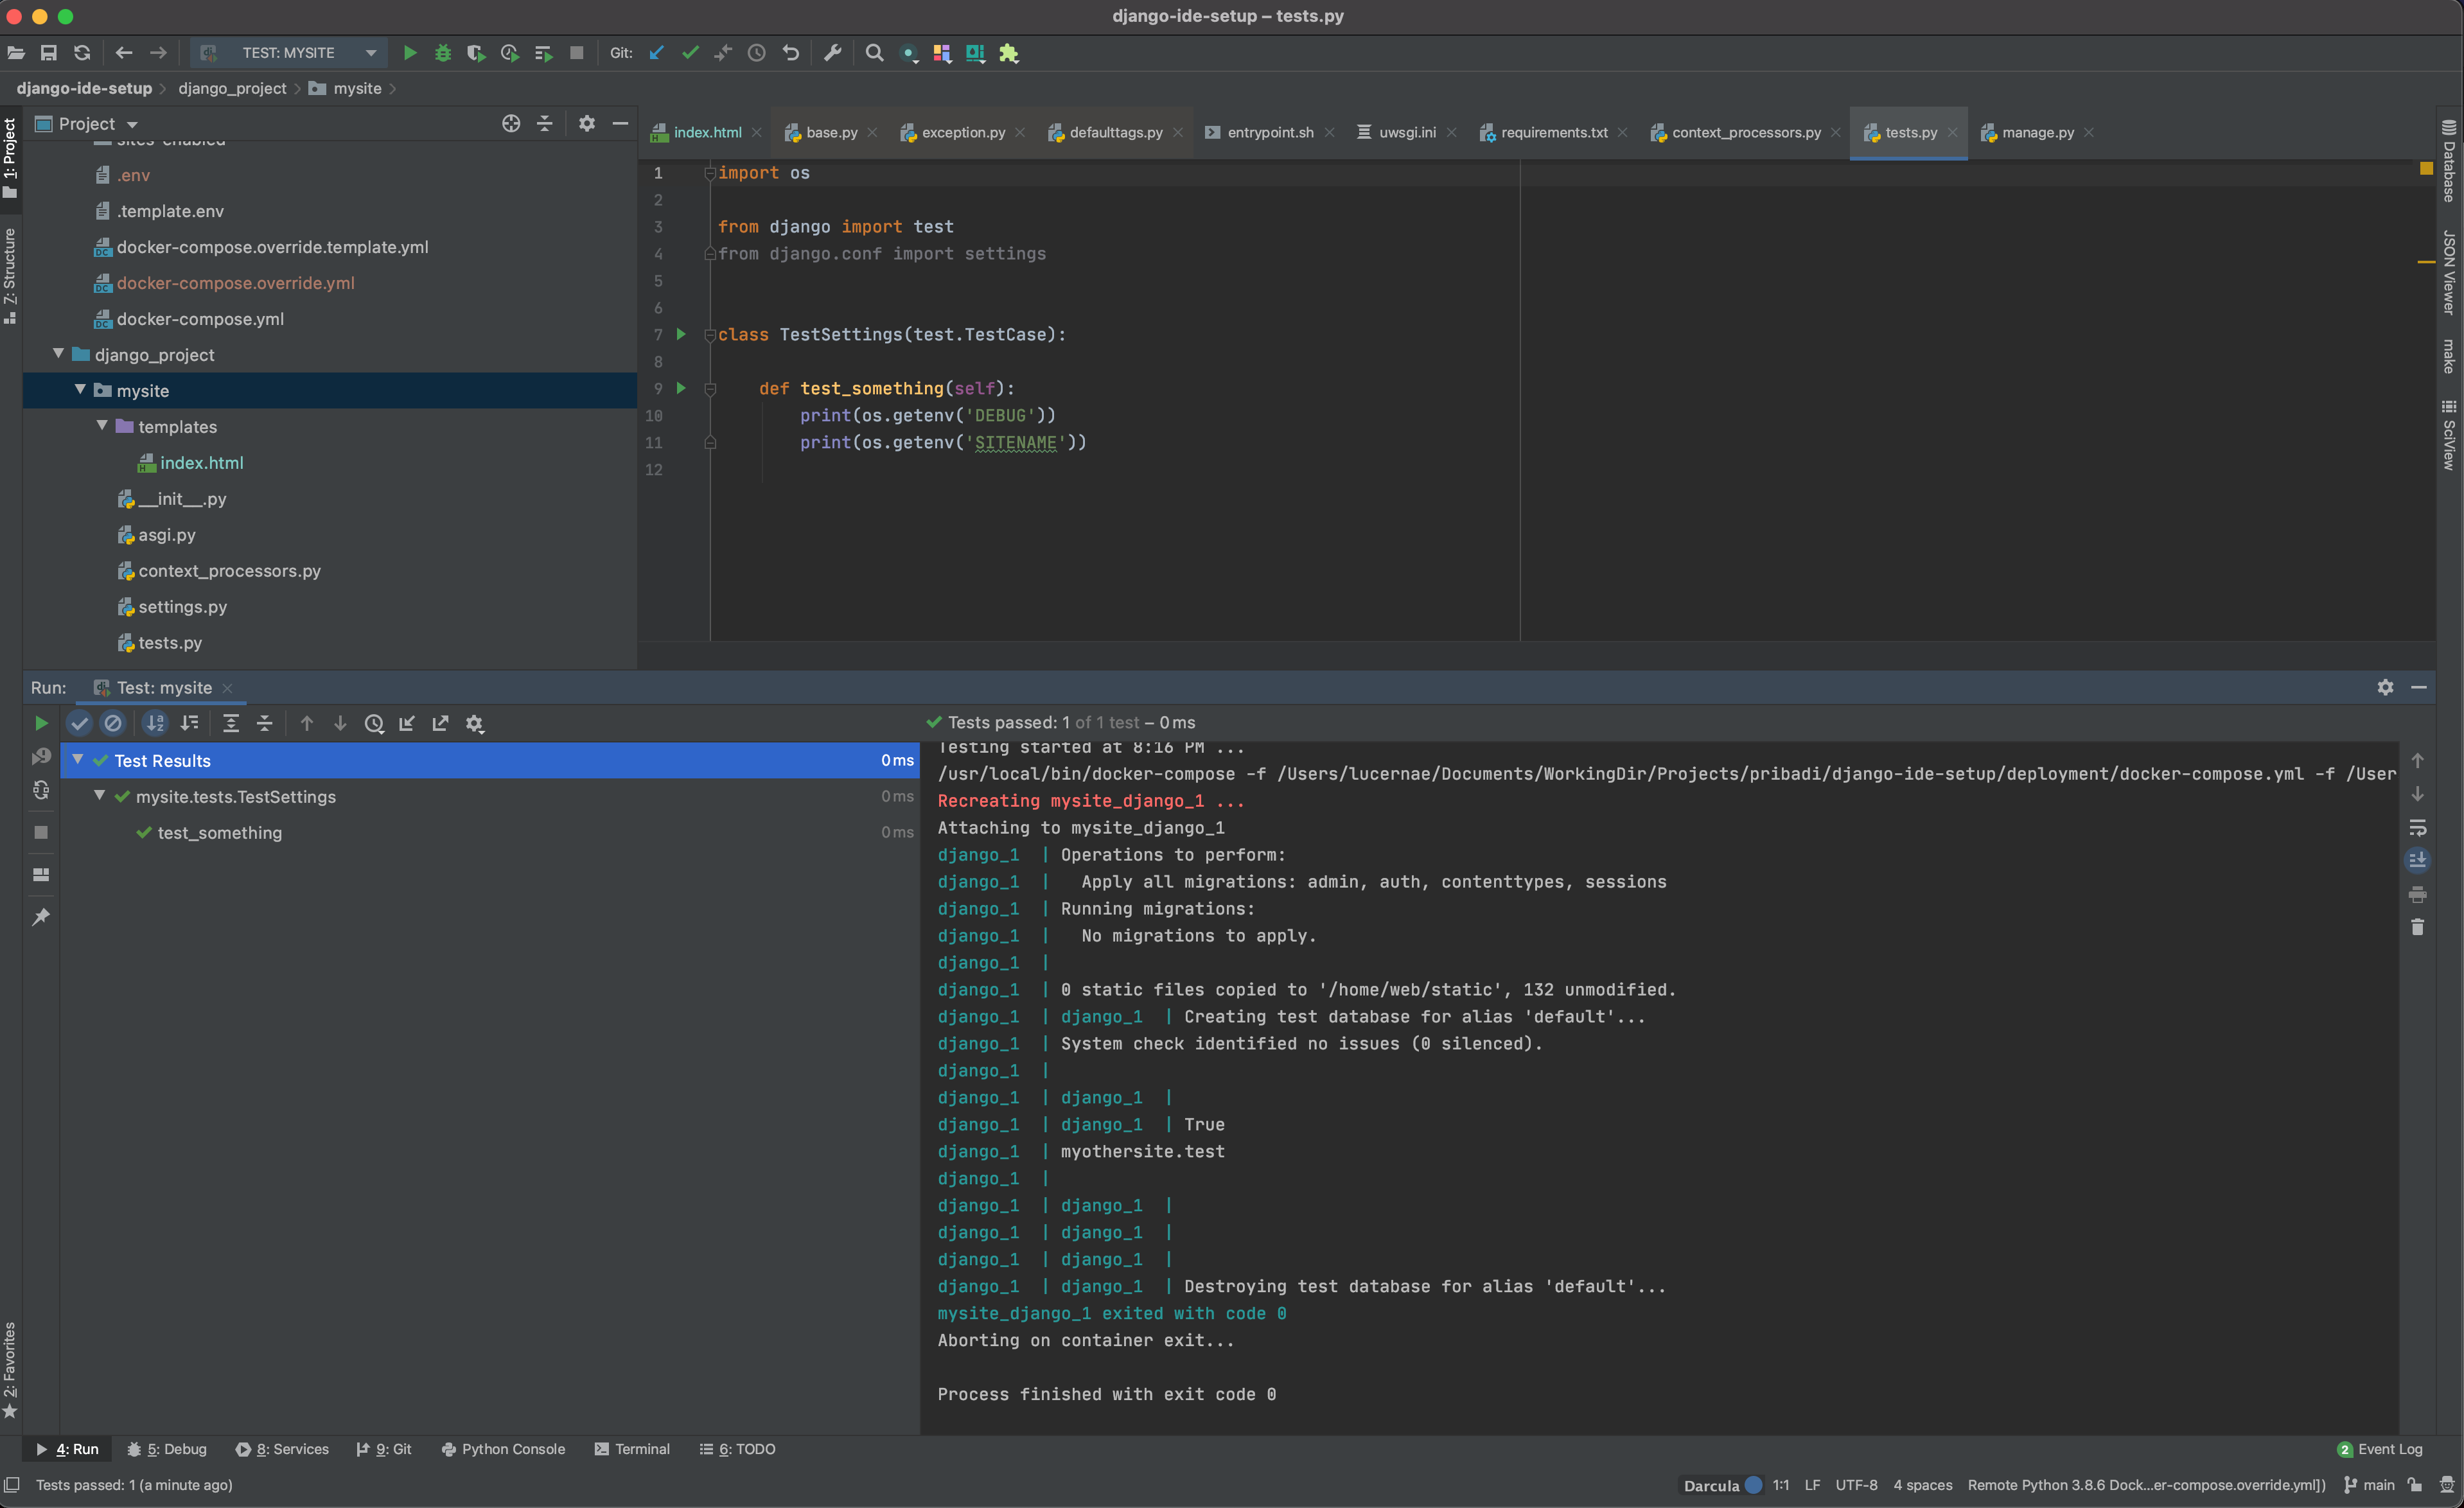
One of the way is to click your test file or test folders, or even the whole Django app module then right click, then click Run test from the context menu. It will create a Run test configuration and run it. Since all of our config are declarative in the .env file, we don’t need to edit the config, unless you need to modify specific settings. Here’s what it looks like when we do that.
Other way of running the test, if you need just to run a single specific test, you can click the arrow button (also can be seen in the screenshot) in the line where the specific test method are declared in the test file. Then PyCharm will only run that.
Some (optional) beta setup
Finally, my last tips here is something that I really waiting for in PyCharm. From my conversation with @gamesbrainiac in twitter: https://twitter.com/gamesbrainiac/status/1320793098658762753 . It seems you can store Run configuration as a file now. So, if your project is complex and you have crafted specific run configuration. You can share it to your other dev in the team as well. Especially if the deployment is the exact same (because we are using declarative docker-based deploy). You can use it to allow developer to deploy latest changes to staging server with just a click. However this is more of a devops related topic. So, in general you can share run config to allow your colleague to run unittest or local deployment the exact same way. Just make sure that you don’t store sensitive data in it.
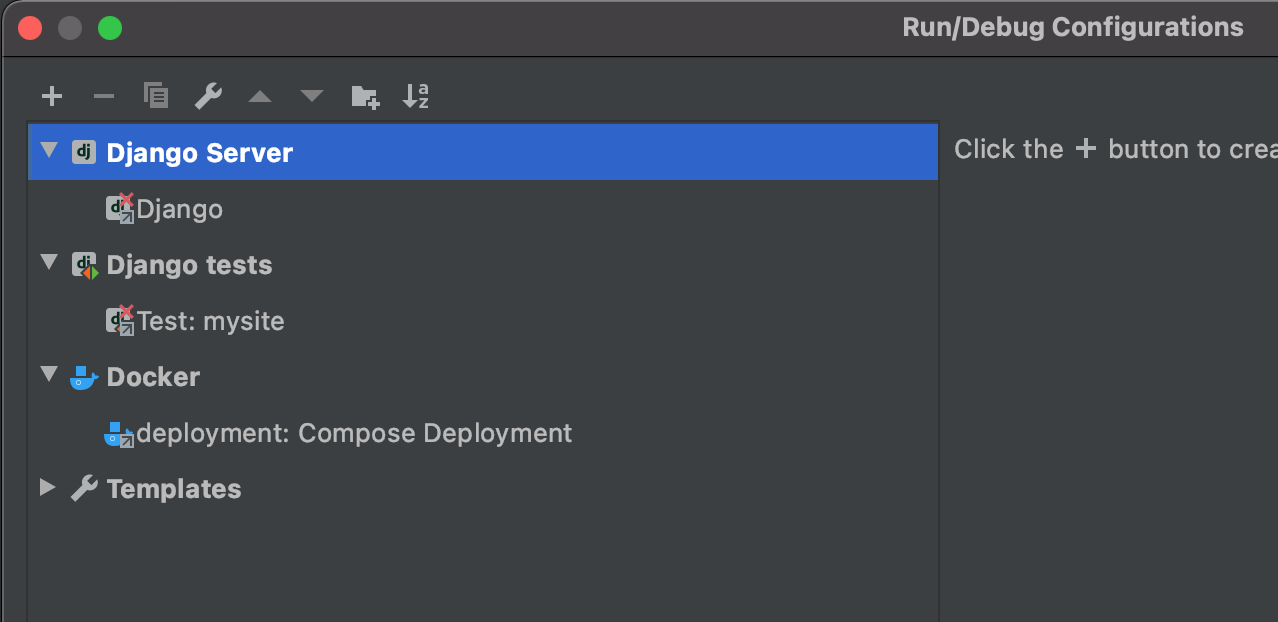
To demonstrate how feasible is this. First, let us imagine that we haven’t made any run configuration. We want to use what’s already been given in the repository. Open the repo inside PyCharm. The Run Configuration list will be empty. However, if there are run configuration in the repo, it can be detected. First open the Edit Configuration menu. As you can see there are 3 broken Configuration:
For the docker-compose configuration there is no other editing needed so you can just click OK and run the config.
For Django-based config. You need to enable Django support in the project settings first. The dialog conveniently give you Fix button so you can click on it.
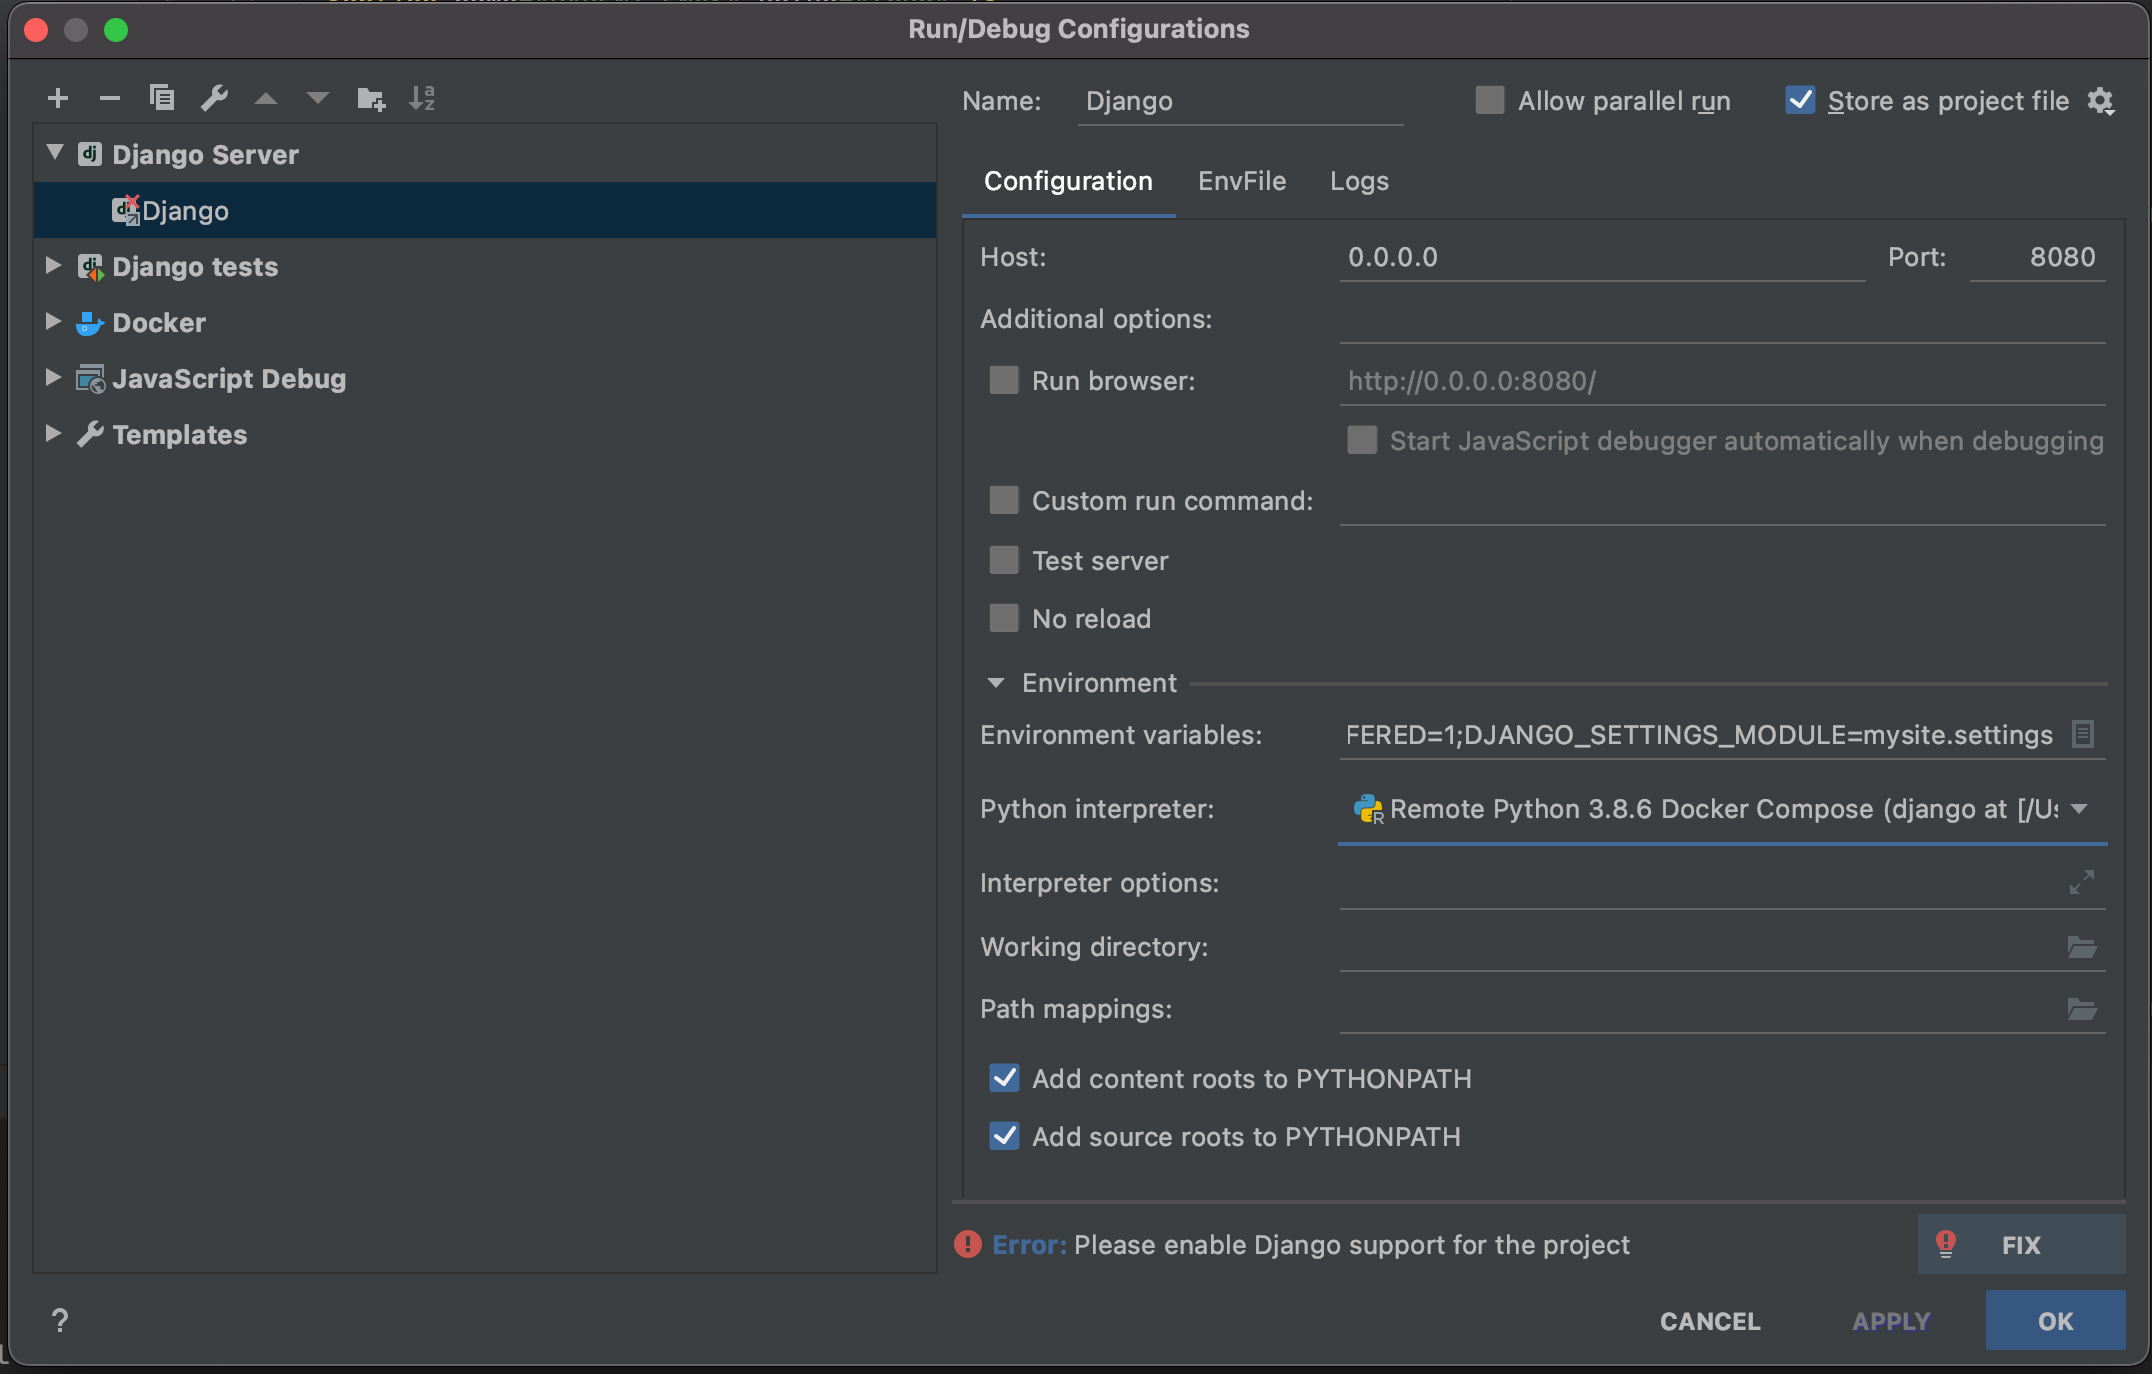
Proceed to fix the problem by following the wizard. Typically what you need to do is define the interpreter again and enable Django support. After that you can run the config again.
I have somewhat conflicting opinion on this share run configuration thing. This kind of workflow seems pretty promising, but at the moment it feels like a beta feature and not solid enough. What it lacks at the moment is to store the interpreter information in a modular way, so it can be imported easily. This feature also not easily discoverable. If you store your run config as a file and persisted in a git repo, then your colleague can only discover it by opening the file and noticing that PyCharm gave warning that it is a run configuration file, which then you can proceed on clicking the warning and making it available in your local PyCharm installations. So take this last tips as optional beta.
When this feature are going to be solid enough, I think it is going to make PyCharm to be a very ideal Python IDE to collaborate. I imagine we can just put the config inside the repo and then your colleague can just do first setup with relative ease to run the project. Totally incredible.
Conclusions
I have demonstrated some amazing PyCharm capabilities for microservice based python debugging setup. It also has a potential to be one stop shop for creating a unified IDE setup for a team of developers, which can be productive for projects where the developer come and go. This will enable new developer to get in the workflow much easily, as everything has already been prepared from the start.
It’s also important to notice that this seamless integration were only possible if your project setup is declarative from the start. It’s also ok for developer who are not using PyCharm to start the project, but the developer who uses PyCharm is also using the same exact configuration. So that means, even though they have different method when they do their own development, they share the same, repeatable project config. It will allow them to use the same config and tailor it for their own specific IDE.