Published
- 12 min read
Raw Disk access in VirtualBox
The motivation comes from when I have Windows in my PC not able to boot correctly. The article was made for self documentation in general.
Intro
I have triple booted my PC. It was able to boot Windows 10, Linux, and Hackintosh using separate UEFI partition, on separate disk. If I have some problem with one of the OS, I just boot to other OS and access my data there. For example, I can mount NTFS disk with read only permission in Linux. Usually, this is enough to just browse and extract some data.
At some point, I need to run some Windows command when the main Windows is broken, but I don’t have any disk partition to spare to install Windows for recovery. I began to wonder if we can just expose /dev/sda (my main Windows disk) to Windows VM in VirtualBox. That will allow me to compare some files from Windows in disk with Windows in VM. Useful for diagnostics.
It turns out that this is possible in VirtualBox, but very highly experimental features. It may possibly damage your mounted disk in VMs. So, experiment with care. This is an expert level features. Only do the following if you understand what you are doing wink-wink-wink.
As a disclaimer: I will not be held responsible for any data loss or damage that you experienced by following this guide. You have been warned.
Now that we already roll out the formality out of the way. Let’s experiment with this thing.
Requirements guideline
To provide more contexts and avoid accidents as much as possible. I list out my environments and guidelines here as reference:
- Main disk to mount (let’s call it
/dev/sda) must be a separate disk from the disk that runs the OS that runs VirtualBox VM. In my case here, I run VirtualBox from Ubuntu in my/dev/sdb. Having separate disk allows you to mount/dismount with ease and confidently sure no race conditions happens with the main OS. - In theory you can do it with host OS in Windows, Linux or MacOS. But for now I only tested it in Linux/Ubuntu
- I only uses raw disk with data partition and UEFI-boot. Do proceed with care if you use Legacy BIOS boot, both in the host OS and guest OS. AFAIK, legacy BIOS store boot information in the partition table and was not very flexible. There is a risk of damage compared with using UEFI (which has it’s own boot partition).
- Last tested on latest VirtualBox 6.1. Host OS: Ubuntu 20.04. Guest OS: Windows 10.
- Create disk image (for backups) if you want, for the disk that is going to be mounted.
Terminologies
Let’s use a set of accepted jargons so we have an easier time communicating.
- Host OS: The OS that runs natively in your computer
- Guest OS: The OS that runs on top of VirtualBox as a VM on top of your Host OS
- Raw Disk/Physical Disk: A real physical disk attached to your PC as a real physical thingy. It can be an SSD connected with SATA/NVMe, or HDD, or even SD Card or USB, as long as the device are recognized by the Host OS natively. In Linux, usually this means that the devices are listed in
/dev. - Virtual Disk/Virtual Hard Drive: A file definition used by VirtualBox that is not a real drive, but rather contains description of it.
- UEFI: Specification for boot mechanism that allows you to boot from a firmware program stored in a declared EFI partition and path, instead of assuming a specific location in the disk (Legacy BIOS boot). In this article we refer to UEFI as the boot process rather, to simplify things.
- Target Raw Disk: The disk that you want to mount inside the VM. In general you want to mount a virtualbox drive (which contains the guest OS and stored in host OS as a big blob file) AND the virtual drive (which contains access to a separate, real, physical disk).
Creating Virtual Drive File pointing to a Raw Disk
We are going to create a virtual drive file that points to the whole disk device for raw access.
-
Check that your VirtualBox and a CLI called
VBoxManageare the same versions.VBoxManage --version -
If you can’t find
VBoxManagein the shell path, you might need to manually locate it and add it to path, depending on how you install VirtualBox. -
Be very sure to unmount the target raw disk from your host OS before proceeding!
-
Create a virtual disk definition using VBoxManage. It will generate a VMDK file in your specified location, with the definition to have raw access to your specified disk device.
filepathmust have.vmdkextensions.VBoxManage internalcommands createrawvmdk -filename "<filepath>" -rawdisk <devicepath>a. In Windows,
<filepath>uses Windows convention. For exampleC:\Documents\VMs\MyVM\physical_disk.vmdk. While<devicepath>is the device ID returned by WMIC. For example:\\.\PHYSICALDRIVE0-
Sample command to run WMIC to list all disk
wmic diskdrive list brief /format:list
b. In Linux,
<filepath>uses Linux convention. For example/home/ubuntu/Documents/VMs/MyVM/physical_disk.vmdk. While<devicepath>is the Linux-style device path. For example:/dev/sda- In general, sysadmin probably already familiars with Linux device. You can list it yourself in
/dev. In the case that you need to make sure which device is which, just open it using GUI tools like GParted as they also provide the device path in the UI. Again, don’t forget to unmount it before running the VBoxManage command. Usedfto list all mounted device and make sure your target device is not on this list.
c. In MacOS, similar with Linux,
<filepath>uses Unix/BSD path convention. For example/Users/user/Documents/VMs/MyVM/physical_disk.vmdk. While<devicepath>is the Unix/BSD-style device path, similar to Linux. For example:/dev/disk0.- You can check the device list using
diskutil listcommand, or open Disk Utility GUI tools, select the disk and click Get Info from the context menu. - As I understand, normally a Mac device uses it’s own SSD/brand. So it’s very unlikely that you attach your own separate SSD inside your MBP or iMac. In conclusions, your disk probably an external one attached via USB or SD Card. In that case, consider provides a raw disk node instead of the usual disk node. For example replace
<devicepath>with/dev/rdisk0instead of/dev/disk0.
-
-
Now that you have your raw disk VMDK file, attach it to your guest OS via the VirtualBox Configuration GUI. It’s important that the guest OS uses the same boot mechanism if the mounted disk is a bootable disk. If the raw disk is a UEFI bootable disk, the guest OS should also use UEFI. Unless you know what you are doing.
- Of course, with the VM powered off at first. Open your guest VM settings. Go into Storage menu, add a new storage controller (typically the same controller with your real disk). Add a new storage attachment and choose your previously created VMDK file. Typically you have two device attached in your VM like the screenshot below (
physical.vmdkis my physical disk definition).
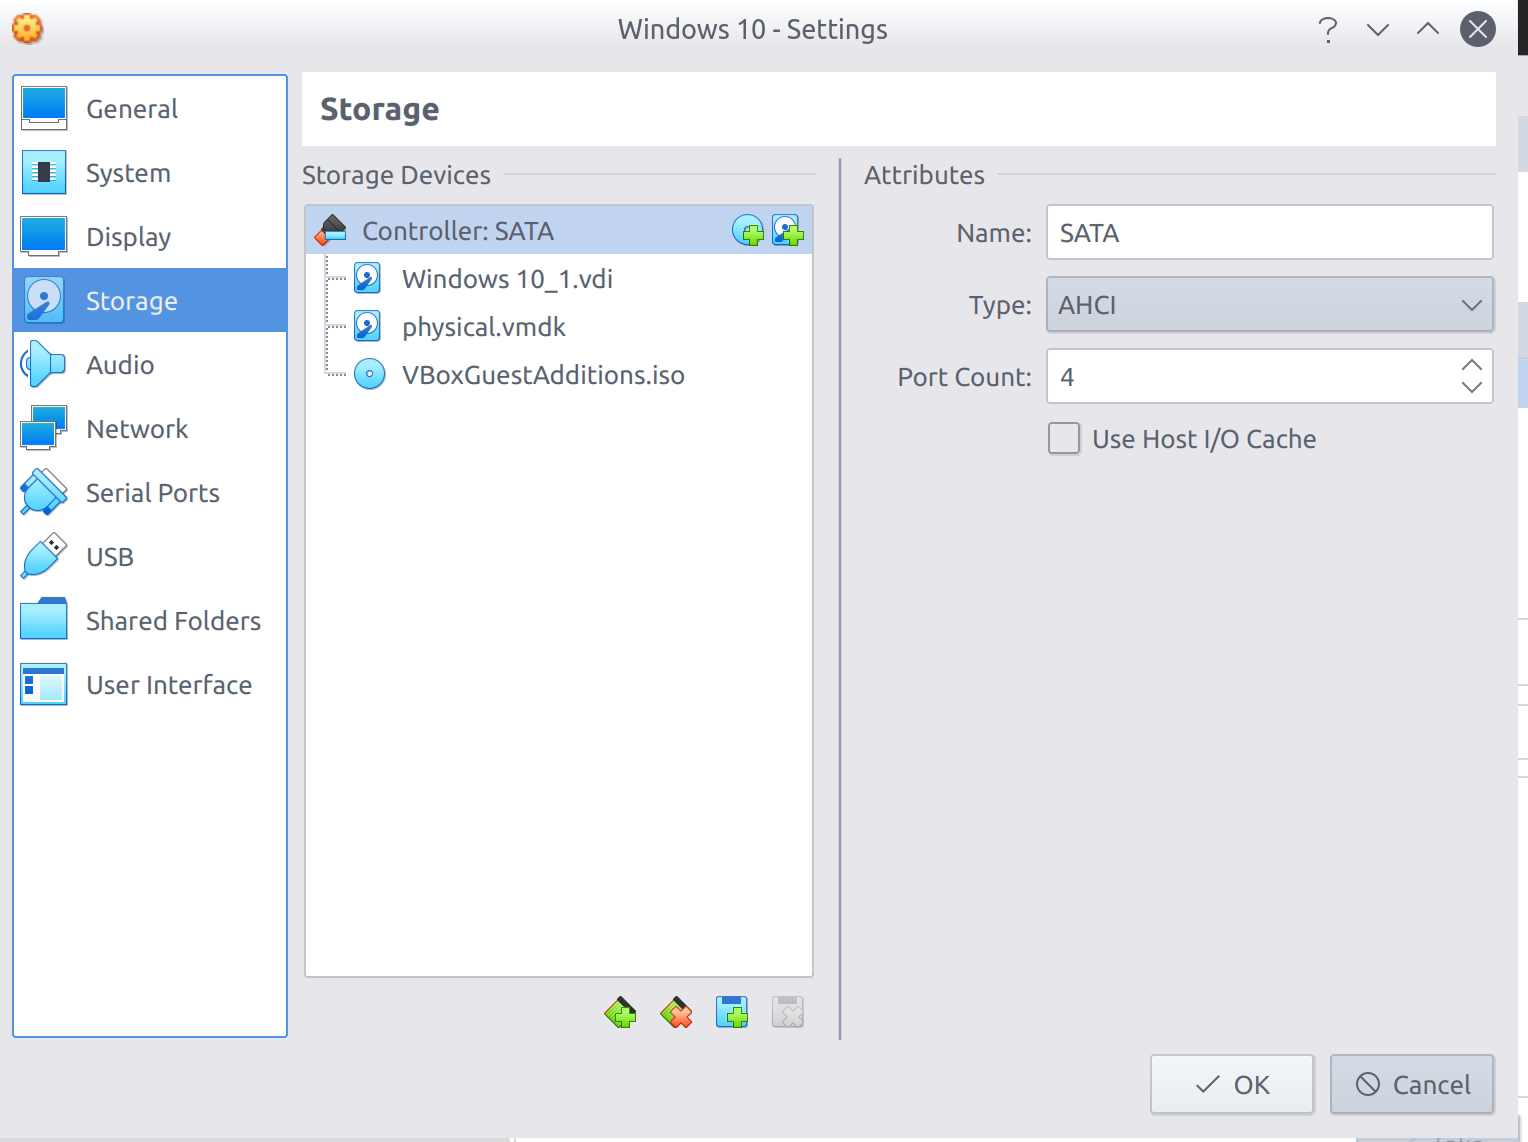
- Of course, with the VM powered off at first. Open your guest VM settings. Go into Storage menu, add a new storage controller (typically the same controller with your real disk). Add a new storage attachment and choose your previously created VMDK file. Typically you have two device attached in your VM like the screenshot below (
-
Boot up your VM and then see if you can access/mount the disk from inside your VM. Also, make extra special care that you don’t double mount the disk/partition in the host OS and guest OS at the same time. Which is why I recommend testing against different disk. This is some screenshot of the raw disk (containing Windows) that is mounted in my Windows guest OS. As you can see, the Drive Letter
D:andE:comes from a physical disk.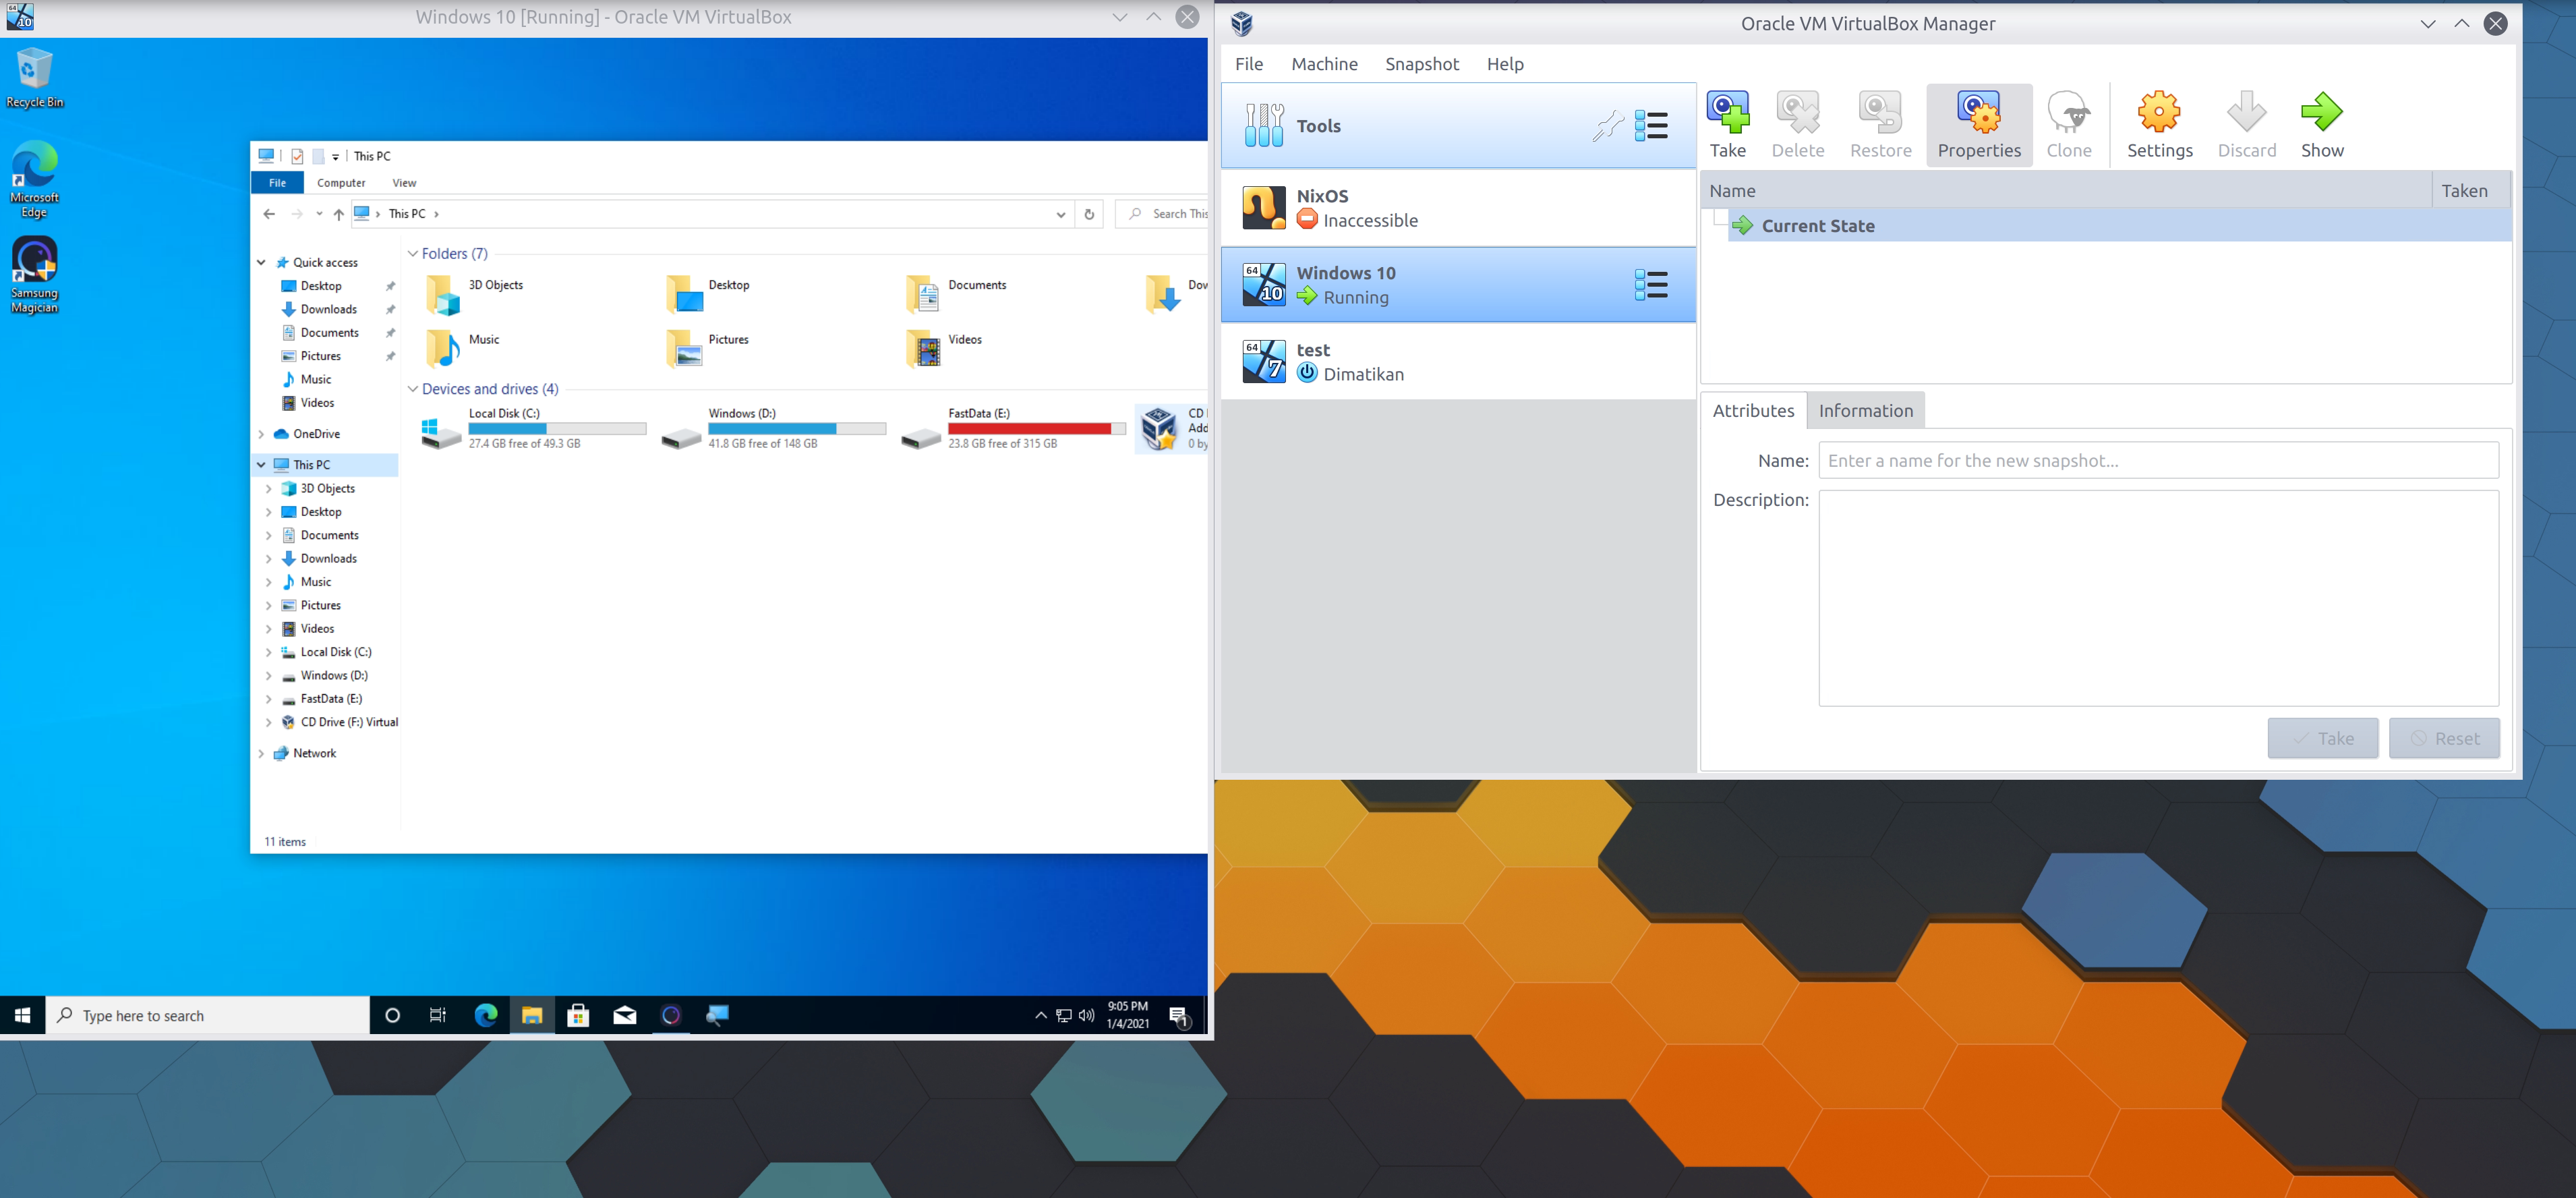
Creating Virtual Drive File pointing to a Raw Partition
In case you need to limit raw disk access to just a select partition, the process is kind of the same. But now, specify the device partition instead of the whole disk.
The first setup is the same, so we are going to skip to step 4:
-
Same command, but with extra parameters:
partitionsVBoxManage internalcommands createrawvmdk -filename "<filepath>" -rawdisk <devicepath> -partitions <partitions>To list the partition numbers in a cross-platform way, you can use
VBoxManagelike this:VBoxManage internalcommands listpartitions -rawdisk <devicepath>Then you could identify the partition you want to access by looking at it’s size.
a. In Windows host OS, currently I have no idea on how to refer the
<partitions>as usually Windows refer it as volume. There doesn’t seem to be any specific mentions on the VirtualBox docs. I can only assume that it uses the same partition number as if the disk are seen from Linux orVBoxManage internalcommands listpartitions.b. In Linux,
<partitions>are comma-separated list of partition numbers you want to expose. For example, if you want to allow access to/dev/sda1and/dev/sda3then<partitions>becomes1,3and<devicepath>becomes/dev/sda- Additionally, in Linux, you can create specific access so that only required partitions is accessed instead of the whole disk. Append
-relativeparameter in theVBoxManagevirtual disk creations.
c. In MacOS, similar with Linux,
<partitions>refer to the comma-separated list of partition numbers you want to expose. For example, if you want to allow access to/dev/disk0s1and/dev/disk0s3then<partitions>becomes1,3and<devicepath>becomes/dev/disk0or/dev/rdisk0 - Additionally, in Linux, you can create specific access so that only required partitions is accessed instead of the whole disk. Append
-
This step is the same. Attach your
VMDKvirtual disk image to your VM. -
Same step. Boot up your VM. As seen below is a screenshot when I only expose a data partition in
E:. As you can see that theD:partition is recognized (because I mount it before in this VM), but inaccessible and unreadable.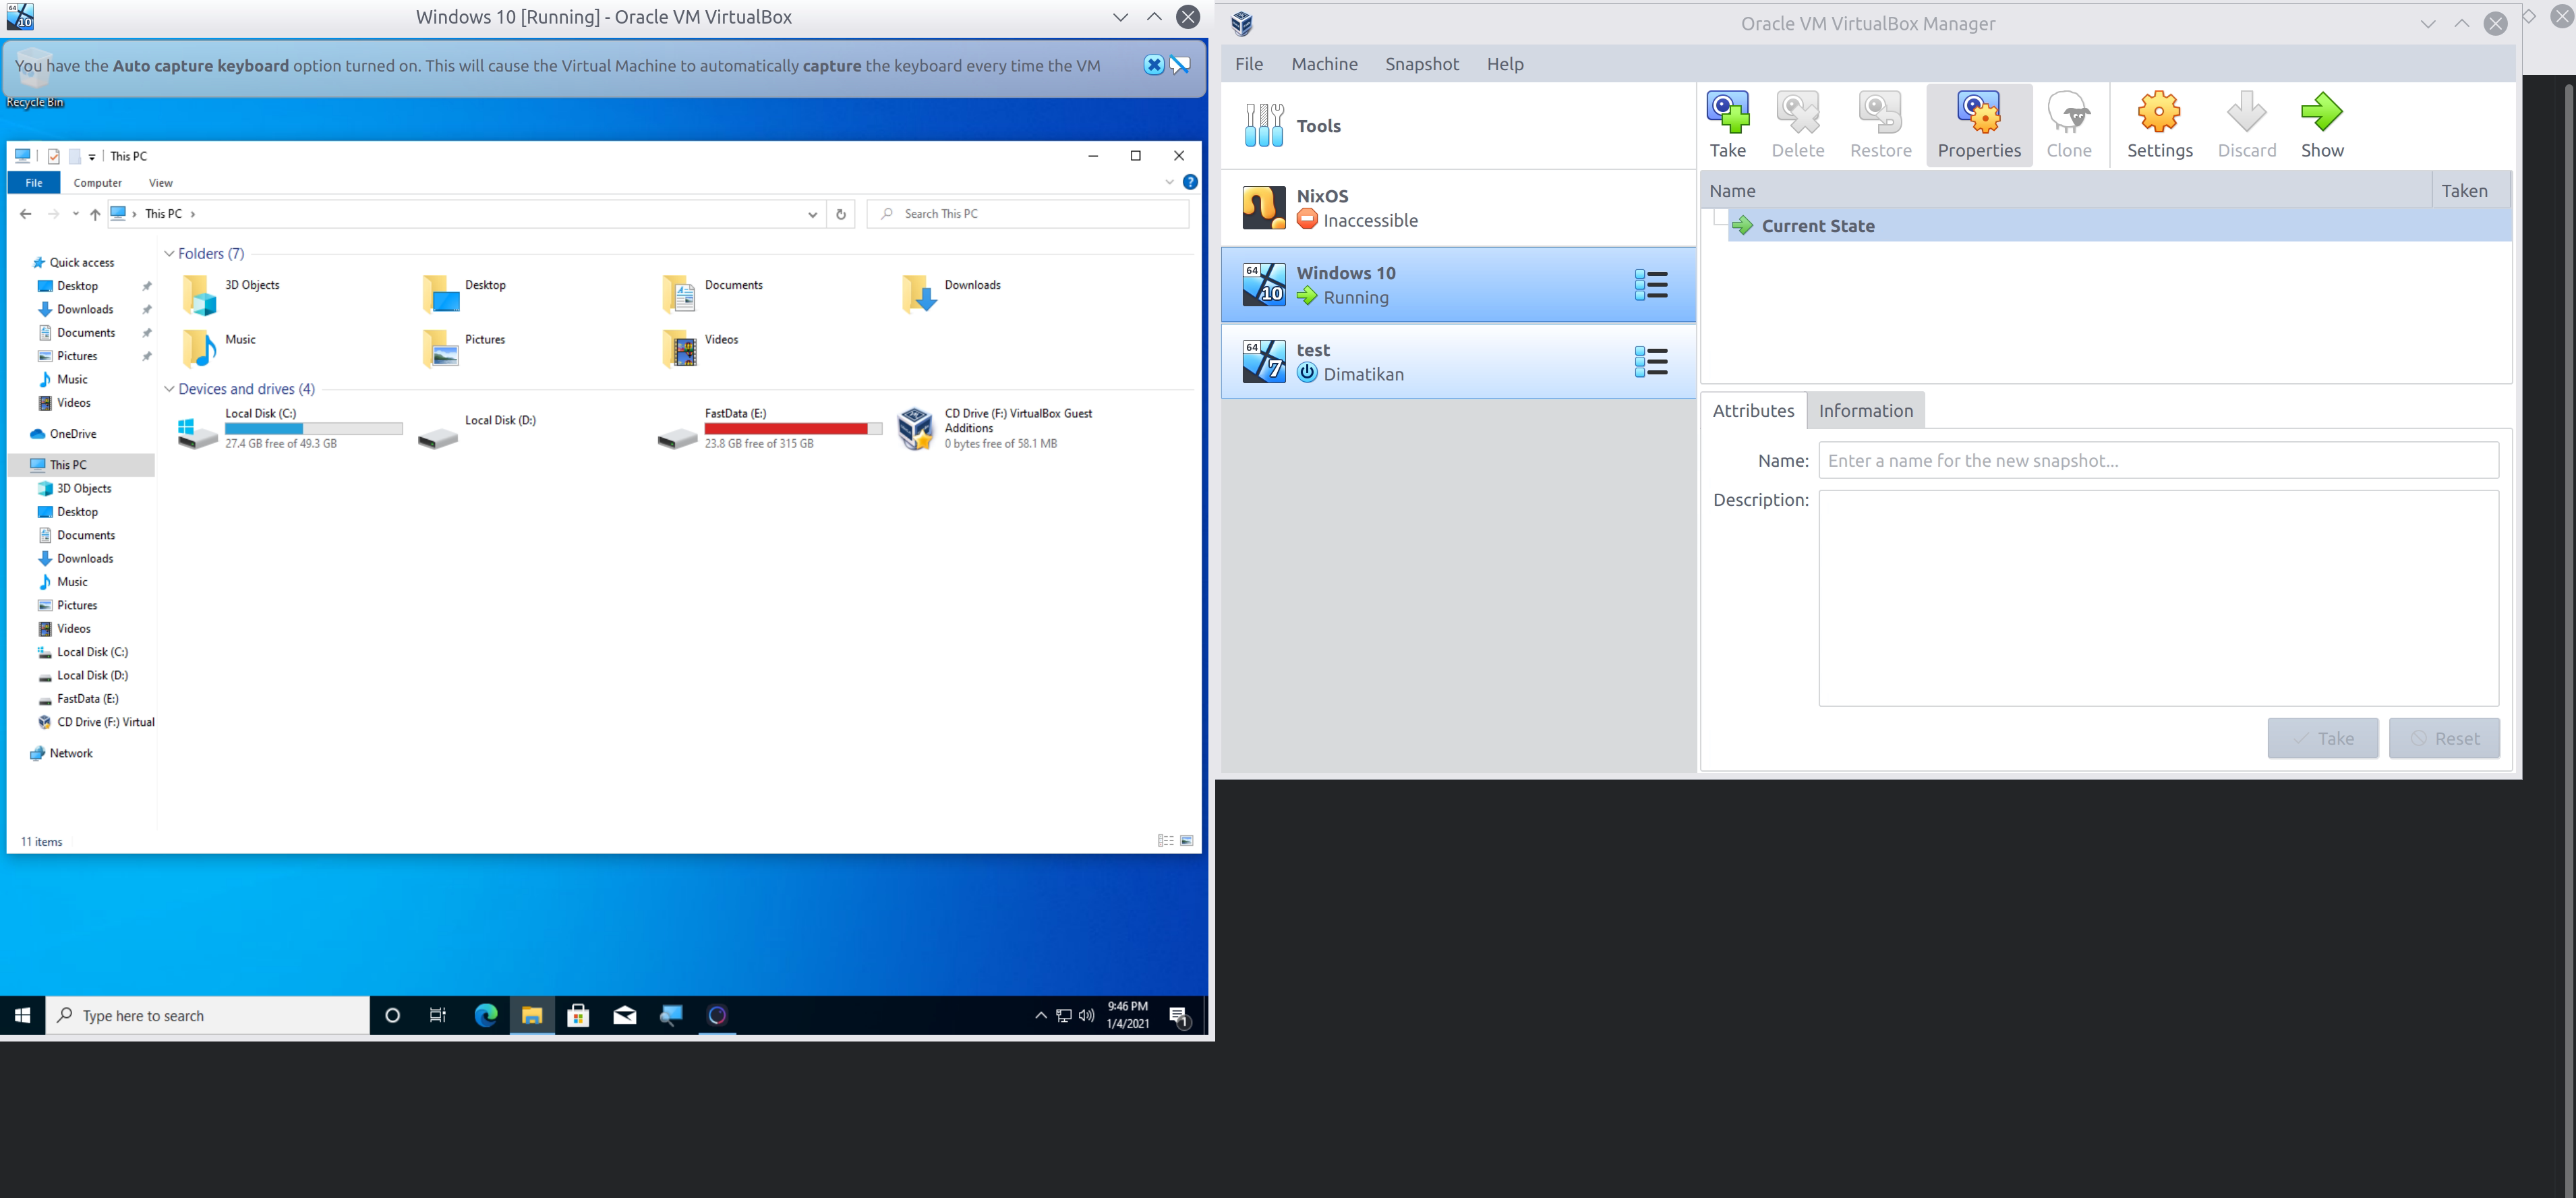
Where to go from here and sample use case
Originally I use this kind of approach to fix my real Windows partition using Windows installed as guest OS. Thus I was able to mount my real Windows partition as extra drives in Windows guest OS and perform Safe Mode recoveries. This is the use case to make the screenshot above, which is mounting physical Windows partition to a guest OS as separate disk, to compare both Windows partitions. If you only need to retrieve data, of course you don’t need to do it like this. Just mount NTFS partition to your Linux and you are done.
Other possible use case:
Boot up raw disk OS as VM
Did I ever mention that you can boot up your raw disk as a VM? Yes if you already have some OS installed in that raw disk, you can boot it up as a VM!
This is a super experimental feature too. The VirtualBox docs gave us a warning:
Most importantly, do not attempt to boot the partition with the currently running host operating system in a guest. This will lead to severe data corruption.
Well hey, where’s the fun if we don’t try to crash and burn our system?
Anyway, they said booting the same partition is very dangerous (well, duh). But probably booting a different partition or different disk is relatively safe.
Crazy use case, but possible. Let’s suppose you have Windows installed using UEFI, then the boot process are self contained. It is safe in it’s disk EFI partition. I was able to boot up my raw Windows partition as a VM using this approach:
-
Create two VMDK files. One is for guest OS (Windows 10 or small Linux distro). The other is the raw disk (real Windows 10 partition in my case).
-
Modify guest OS bootloader to include Raw Disk’s UEFI partition (Windows in my case).
a. In windows guest OS, we can just use
bcdboot D:\Windowsif your Windows Raw partition are mounted asD:. Windows will then add new boot entry to boot using this disk, and it will not affect the raw bootloader of the disk since it’s on a separate partition.b. In Linux guest OS, it’s more straight forward. You typically use GRUB and add new entry to your Windows UEFI firmware. This also will not change the raw bootloader of the disk if you use UEFI. This setup is very similar with how you dualboot Linux + Windows in a typical generic/real PC setup.
-
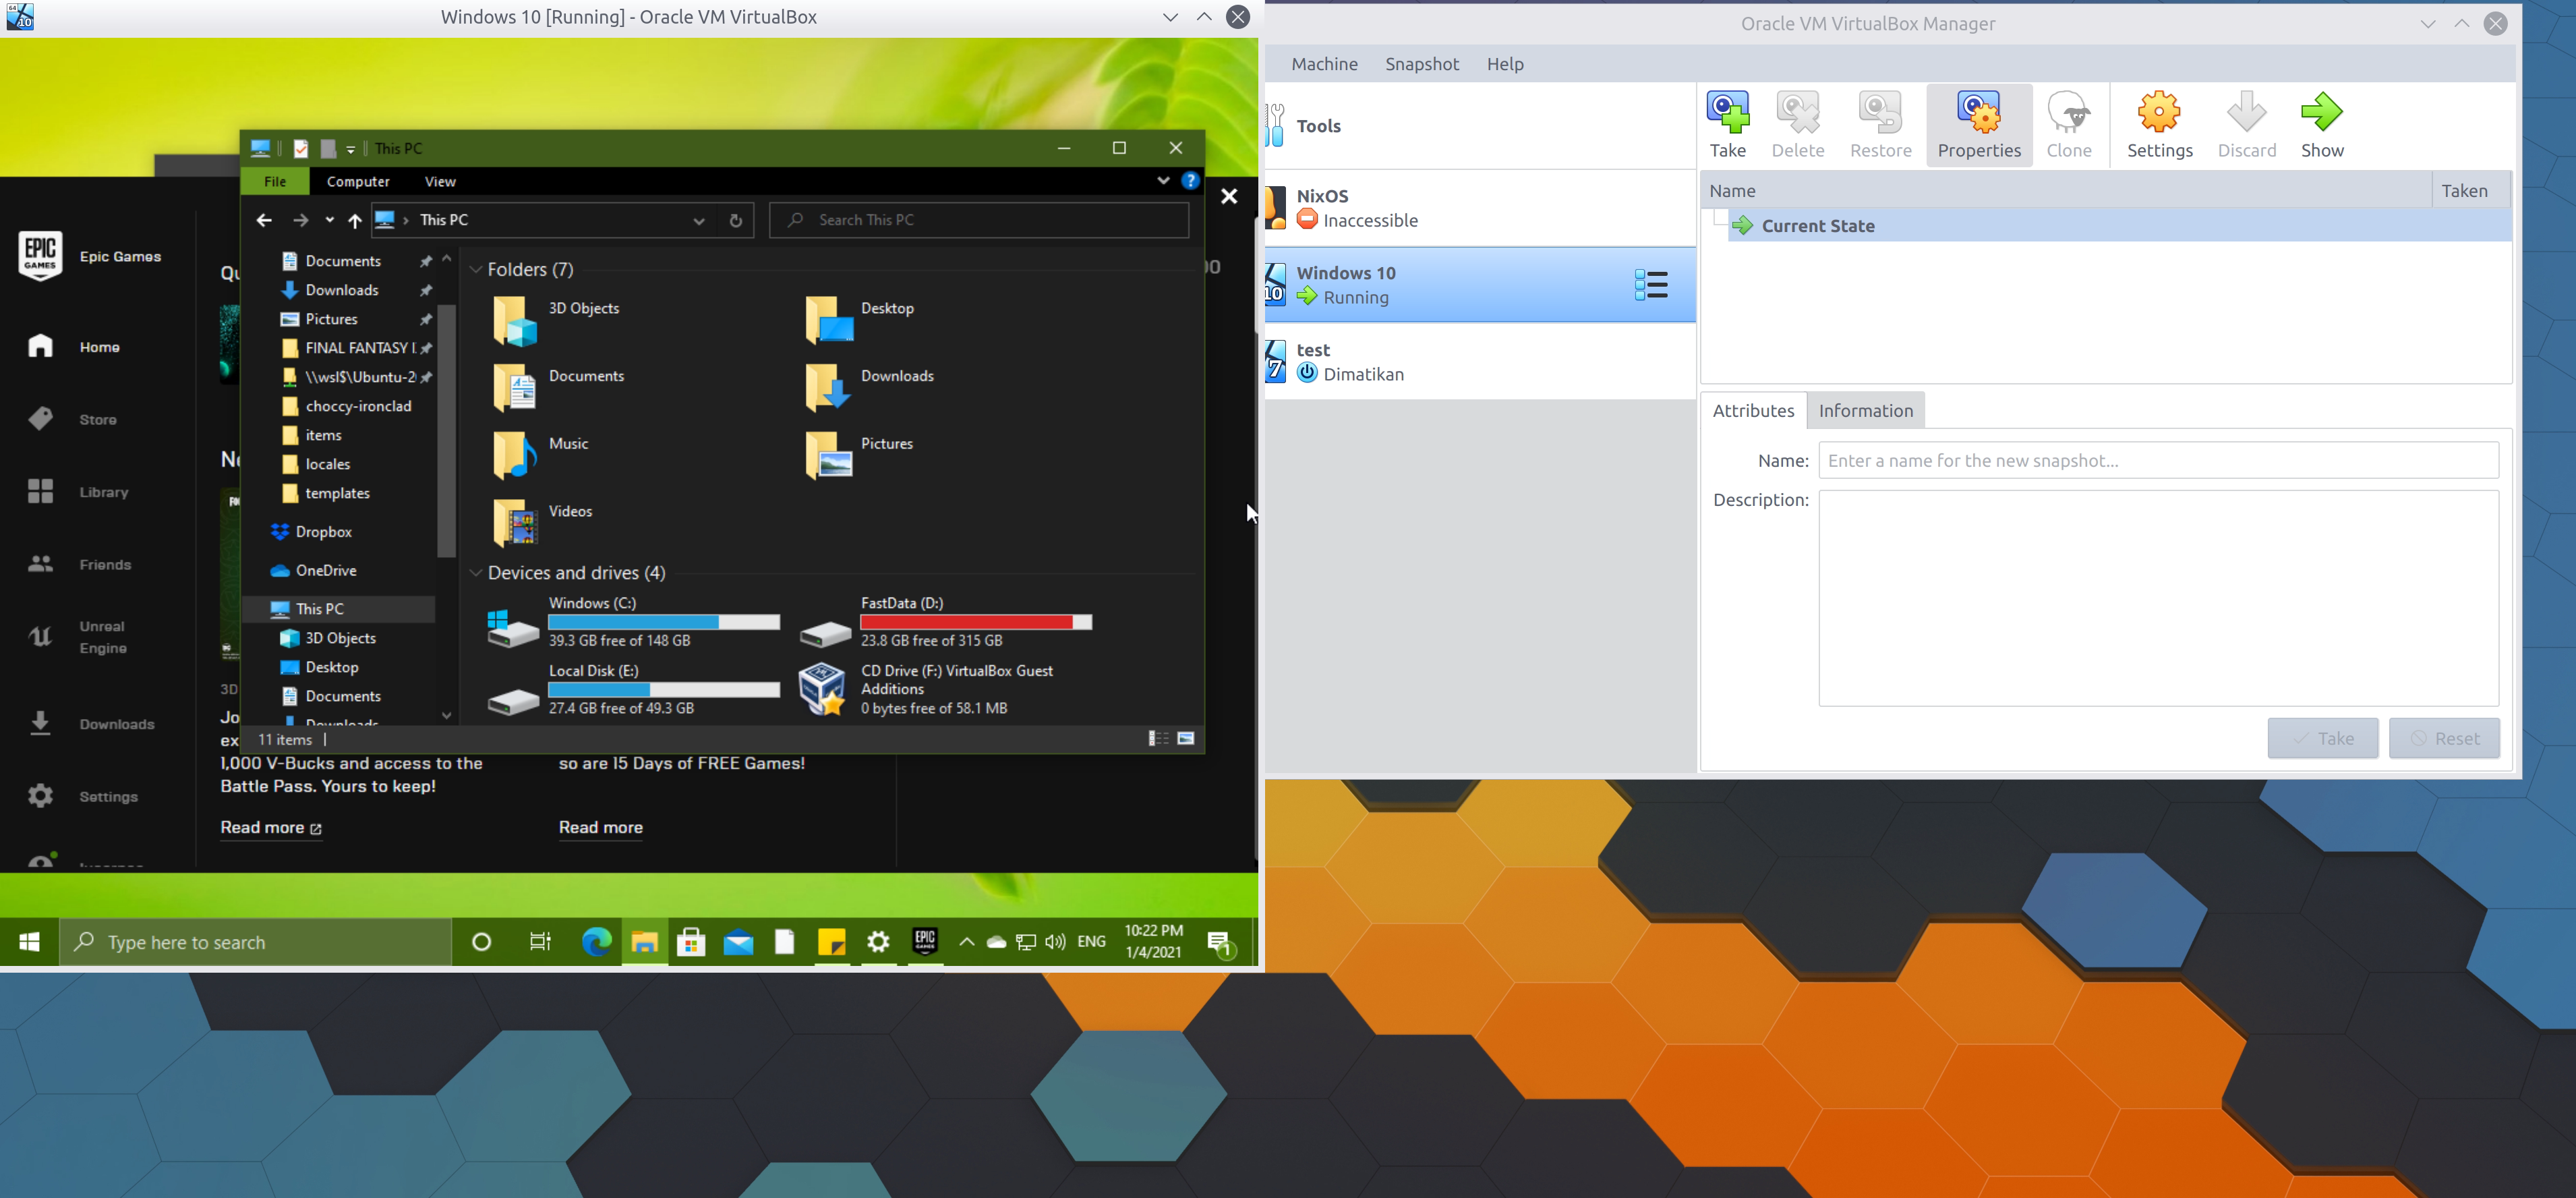
To my surprise the raw disk’s Windows loads just fine with small hiccups, because the hardware’s are different. It’s like moving Windows disk to a new PC, so naturally the graphical driver revert to default. But applications loads just fine so far. One thing to note is if you have hardware-based Windows license, then it’s going to be deactivated because Windows thinks you are on a different computer now. Here’s some screenshot to let you know that I’m not lying. I swear. I mean, I can expect that if I boot raw Linux, it will work, but I never expect Windows to be booted up this smoothly this way.
Accessing physical disk/partitions from inside VM
This is an obvious use case. Suppose that you are currently using Windows, but you have that important file lying in your EXT4 partitions. Well, you can’t mount your EXT4 partitions in Windows. However you can create a VirtualBox VM that loads up small Linux Live Image, then access your RawDisk from inside your VM without leaving your Windows.
For me, this will solve my pain point in Mac/Hackintosh where I can’t access any NTFS/EXT4 in MacOS without rebooting. Now I just use a VM. Neat wasn’t it?
Oh, I forgot to mention. You probably need VirtualBox Guest OS Additions Helpers installed in order to seamlessly copy in or out of VM.
Network Drive Mount
If you don’t need a GUI. Just create a typical Linux VM where it automatically serve a raw disk as NFS mount, or SFTP. You can then copy/mount it seamlessly in MacOS or WSL as if it is a mountpoint.
Checking real USB or SD Card
Well I don’t think you really need to do this. If you want to check a Linux Live USB stick, you typically just mount the ISO directly. But let’s say you really want to do it anyway, you can expose raw external USB or SD Card as disk too in your VM. Perhaps you want to try booting from an external Hard disk/SD Card? I don’t know.