Published
- 27 min read
Lesson learned on deploying Minio with CIFS backend. Part 3
Continuation of Part 2. The previous setup is working but not at all scalable. In this post, we are going to take a look on how to make it scalable, both in storage and processing capacity.
It’s going to be a rather long post because I decided to explain a little bit about the setup.
Problem
Previously, we made it possible to mount Hetzner CIFS storage box in the pod using FlexVolume driver plugin. However, this is not too scalable because we have to install the plugin on each and every node in the cluster that will mount the CIFS storage. Nodes can come and go, so instead of that approach, we are going to look into using Kubernetes CSI driver (Container Storage Interface).
Architecture
Before we dive in into the implementation details. I feel like I need to talk about more MinIO setup in distributed mode.
If the size of the dataset that you want to store/serve in MinIO is fixed, you can use standalone installation method like in the part 2. The size of the disk (or PV) doesn’t change, and it’s easier to setup too. However, if you think that the size of the buckets can increase even outsized your initial provisioned disk, then you have to set up MinIO using distributed mode.
I feel like, there’s not that much documentation that explains this, even in the official MinIO guide here. Sure, they have diagrams and command line example, but it doesn’t tell you how and why those are scalable. The guide assumes you have intermediate knowledge about distributed system. For those who are just started to learn, or a sysadmin in a small-to-medium sized company, we have to explain a little bit more contexts.
Erasure Code (EC)
First, read the official docs for the Erasure Code Guide.
Erasure Coding is a method to make sure that object (or data) that we store in MinIO stays reliable and correct, even though we lost multiple disks/drives. Technically they use a combination of redundant stores and parity checks to ensure this. What does it mean to us?
For MinIO with Erasure Code enabled, if we use 4 disks with 1 GB storage each, it doesn’t mean that the total storage is 4 GB. It might be less than that because some of the space is used for Erasure Code space. This way, if any of the disks fails, we can rebuild the failing disks by inserting a new disks with almost no downtime.
A minimum recommended Erasure Code set up is using a set of multiple of 4 disks, and it is recommended to have all the disks with same storage size. A set means a setup where you use Erasure Code in a given group of disks. Let’s say you are using a set of 4 disks. You can distribute it as one node with 4 disks attached. That means the node have one EC set (of 4 disks). If you have 18 disks attached in a node, (more than 16), then it will have 2 sets of EC (with each consists of 9 disks). You don’t have to really care which disks contains which data. You just have to know that for one object, it will be stored in one set of EC only (regardless which one).
Mapping Erasure Code concepts into Kubernetes
After you understand how to set up one MinIO instance with EC enabled, we need to understand how Kubernetes can help make it scalable.
In Kubernetes, you don’t deal with a disk directly, but rather a PVC (PersistentVolumeClaim) resource or a PV (PersistentVolume) resource. The pod only cares that a PVC is mounted. It doesn’t care how it is actually mounted. Setting up how the data is actually mounted is the job of the StorageClass, or the volume driver.
This way, if you want to mount 4 disks in a pod, you need to create 4 PVC. Then how PV backs up this PVC is actually decoupled from the Pod definition itself. Pod only cares about the PVC name. If at some point the PVC is deleted and swapped with a different PV backend, the Pod will just mount the the same PVC name. This is very useful. To illustrate how this is scalable in cloud environment, consider the following scenario.
One MinIO node with 4 disks (using Kubernetes)
You install MinIO with EC setup (set of 4 disks). The original provisioner uses local bind mount to PVCs named data-0, data-1, data-2, and data-3.
At some point, you decided to migrate all this data into a Hetzner Storage Boxes. You purchases one big storage boxes. You set up 4 PVC with backing PVs all
storing data in Hetzner Storage Box in 4 different directory (via CIFS mount). Operation to move the data can looks like this:
- Force delete a PVC, let’s say
data-0(depending on your setup, the pod might have to be down). - Create the same PVC called
data-0but backing PV is set to use CIFS mount to Hetzner Storage Box in the a corresponding directory. - Run the pod again. It will mount the same PVC
data-0, but the content is empty now, so MinIO healing procedure will kick in. - After healing is done, repeat for other PVCs.
As you can see PVCs and PVs resource from Kubernetes helps abstract away from the implementation details of where the data really is. It can be from a local node disks, a CIFS mount, NFS mount, etc as long as there exists Kubernetes storage driver for that.
Distributed MinIO nodes (without Kubernetes)
The advantage of Kubernetes scaling becomes more obvious when you setup MinIO Erasure Code with distributed setup.
In the distributed setup, you define the EC set yourself, and then you can expand MinIO capacity virtually infinitely by adding new sets each time you need more storage. For a simple example, consider a minimum EC set that contains 4 disks.
If we are using Kubernetes, we are abstracted away from having to worry about where the nodes are. So it is actually easier to just use one pod to serve one disks. Nodes where the pods are going to be run are depending on the scheduler. Since each disk is a PVC with network storage backend PV (CIFS), then you don’t actually need to care where the disk is because Kubernetes will mount it for the pod. For performance reasons you just need to worry that the CIFS storage is in the same network zone with the pod, so latencies are minimized. Let’s say, if you provision the Storage Box in Nuremberg, then at least your nodes are in Nuremberg too.
But, without Kubernetes terminologies, what you are trying to set up is a set of services like in the diagram below.
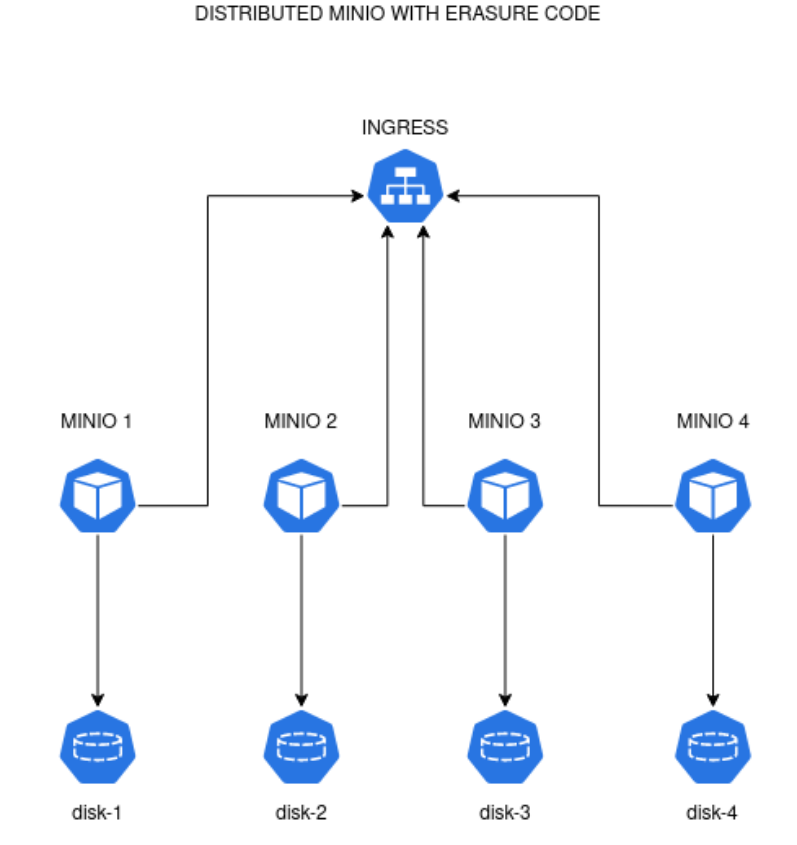
In the setup above we uses 4 MinIO nodes with each node mounting a disk. Typically each of the nodes needs to be assigned an internal hostname so that they can
refer to each other unambiguously. The name can be minio-1.svc.cluster, minio-2.svc.cluster, minio-3.svc.cluster, and minio-4.svc.cluster.
Once you setup these internal names (can be using local DNS resolver, or /etc/hosts entries in each node), you can execute the same MinIO server commands in each of them.
       export MINIO_ROOT_USER=<ACCESS_KEY>
export MINIO_ROOT_PASSWORD=<SECRET_KEY>
minio server http://minio-{1...4}.svc.cluster/data
As you observe above, we are using 4 distinct disks but we mount it in the same location inside the MinIO nodes (in /data path). So the disk index
don’t matter in the command line above. If however you are using 2 disks per MinIO nodes, (so EC set of 8), assuming each disk mounted in /data-1 and /data-2, then use the following command:
minio server http://minio-{1...4}.svc.cluster/data-{1...2}
However, later for Kubernetes setup, there is little reasons on why we are mounting multiple disks in a single pod. It’s far easier to manage those pods if we just use one pod replica with one disk. The command above is just an illustration if you setup EC set of 8 in 4 nodes manually.
With the above setup, each of the MinIO nodes can talk with each other. But traffic from the outside must go thru Ingress, so that the Ingress can load balance the traffic to any of the available MinIO nodes. Each MinIO node then takes care to return the object requested.
Expanding/Scaling Distributed MinIO nodes (without Kubernetes)
Hypothetically, how we are going to deal if the the MinIO instances is full and no more objects can be stored? The docs said that you just need to add another MinIO set, with the same EC config. Since previously we are using a set of 4 disks, we use the same set but we increase the MinIO node ID counter.
minio server http://minio-{1...4}.svc.cluster/data http://minio-{5...8}.svc.cluster/data
The above command means we need to prepare 4 new nodes, minio-5.svc.cluster until minio-8.svc.cluster each of them mounted one distinct disk in /data.
After we have all the nodes up, we execute that command to every node from minio-1 into minio-8. The architecture diagram now looks like this:
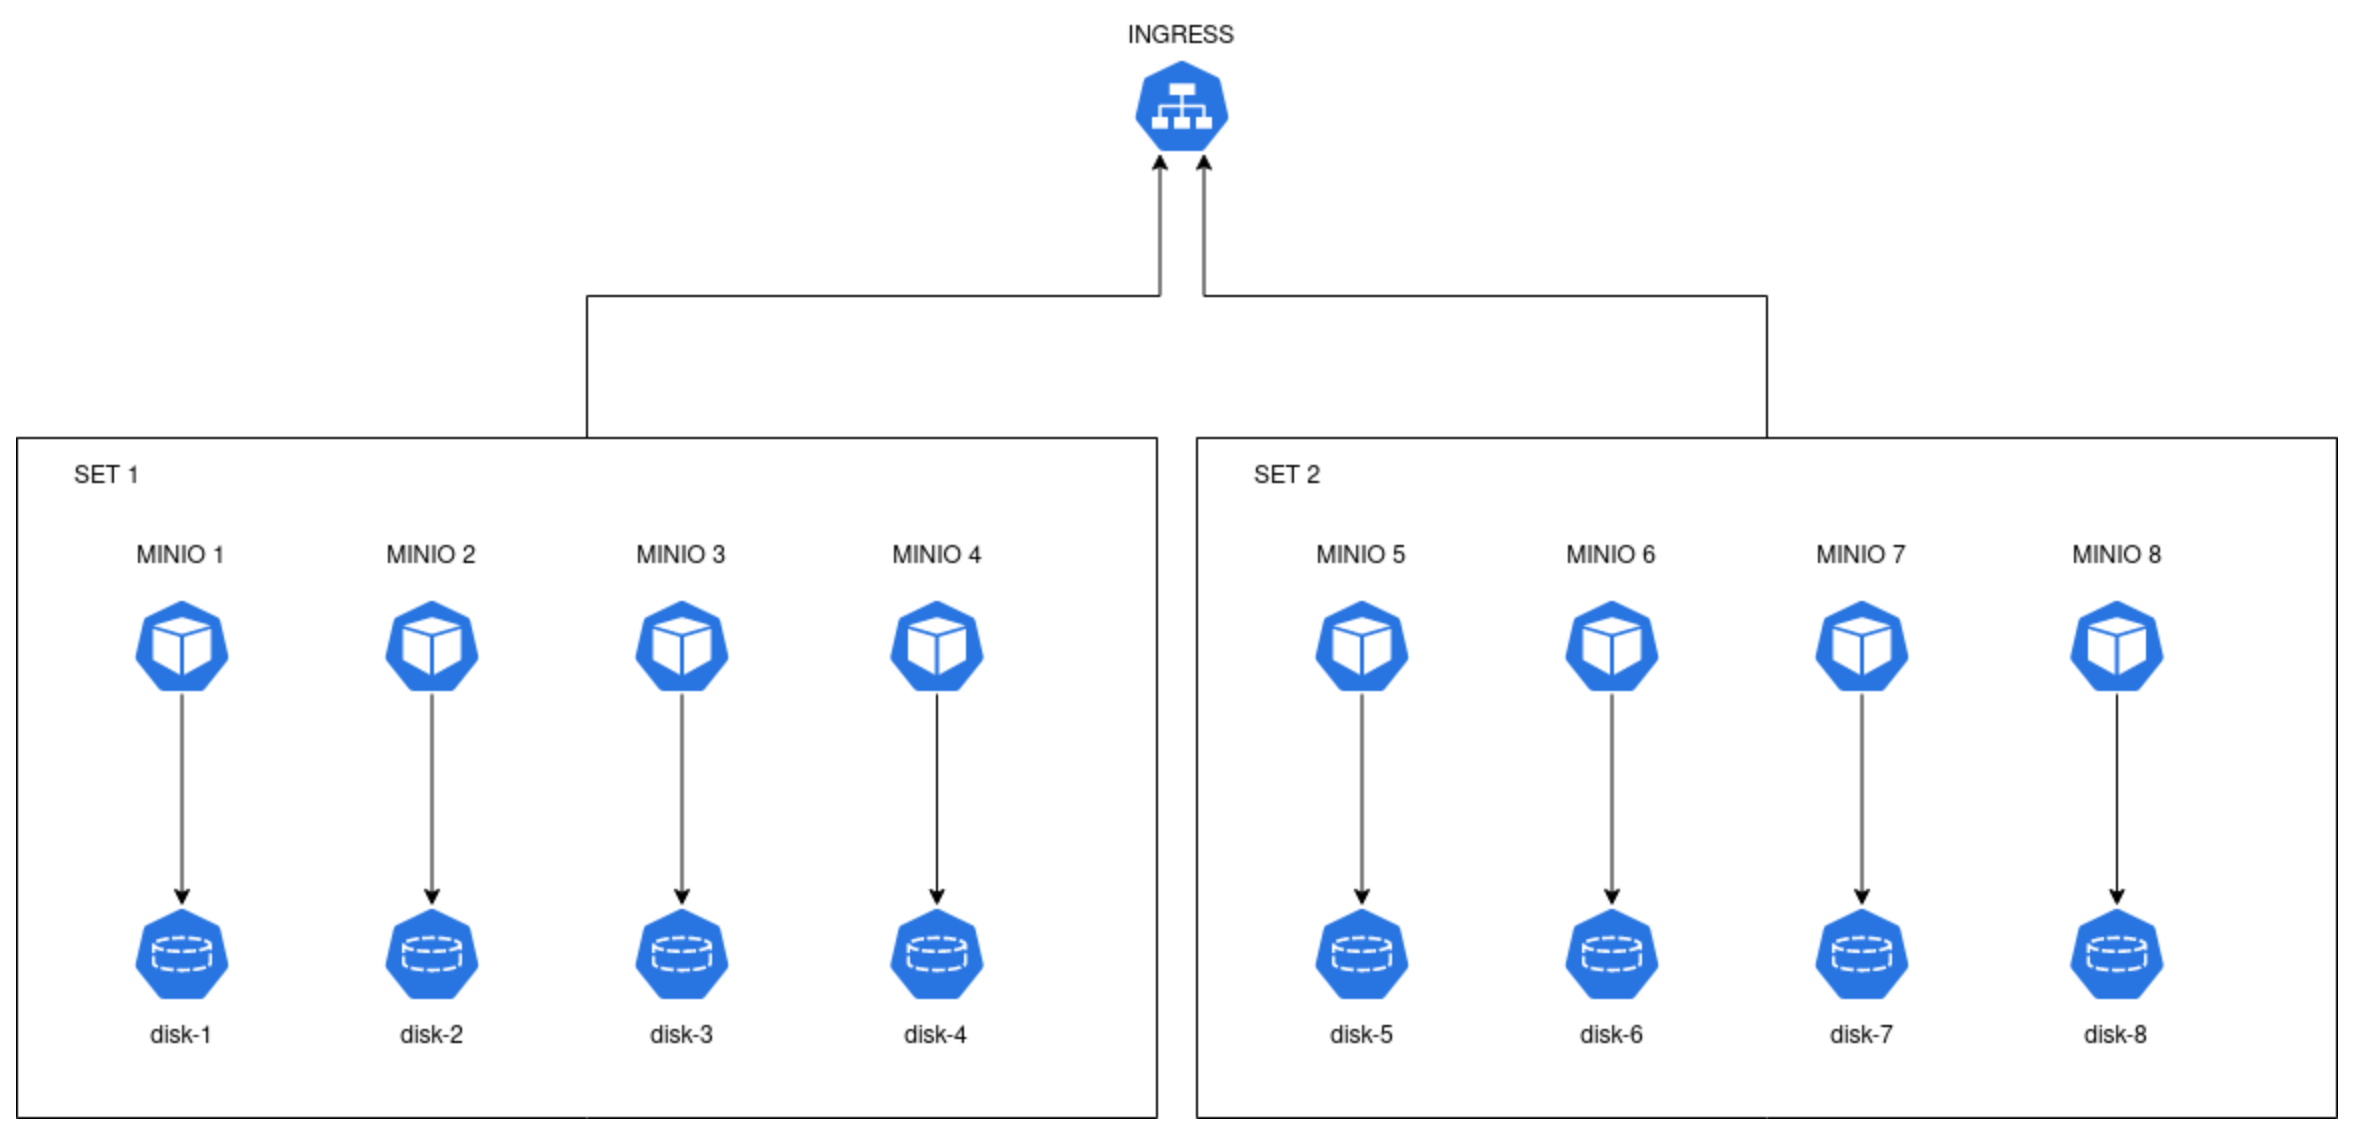
Ingress will pass the request to any MinIO node. If the request is to put a new object and the current set is full (for example Set 1), the requests get passed on to the other set (Set 2). So, this is vertically doubling the capacity of the objects. If one set can store 10 GB, adding another set with the same EC config parity will add more storage capacity. It might not be exactly doubled due to the EC algorithm, but now you know this is how you increase the storage size of MinIO instance.
You can also add a new set, even before the previous set is full. MinIO will then takes care of distributing the objects proportional to the free space
in each set. In this case, it doesn’t seem that each set is exclusive to each other. One object might be distributed into two different set.
To help understand the concept more thoroughly, the official docs called each set in the command above as server pools.
So http://minio-{1...4}.svc.cluster/data and http://minio-{5...8}.svc.cluster/data are two different server pools with the same EC set configuration.
Scalable Distributed MinIO with Kubernetes
Of course, with the above concepts, there are several ways to accomplish that. For my experiment here, these are my requirements:
- I want to schedule MinIO pods only in the set of nodes I labeled
- I provision one Hetzner Storage Box for one server pool (different disks in a pool mount to the same Storage Box)
- I manage these pods using StatefulSet
- I install each MinIO pools using Helm Charts or Kubernetes Operator
- I arrange internal MinIO names using Kubernetes Services
These are the reasons why I took this requirements.
For requirement 1, I don’t want to be bothered on where the MinIO pods is going to be scheduled. It can be on a single Hetzner node, or spread across different nodes.
It can die and spawned in a different node. If the storage is completely using Samba/CIFS then it can be attached to any node in the Kubernetes cluster.
So, to achieve this we labeled pool of Hetzner nodes that is dedicated to run MinIO with certain labels. It can be as simple as role=minio.
For requirement 2, We have to remember that a minimum EC set contains 4 different disks. But, we are small-medium company. It might not be efficient for us to buy 4 different storage boxes. But we also want to have a possibility to scale later on. For these types of company, it is much reasonable to just buy one big Hetzner Storage Box to be used as 4 disks in the pod. We are only using EC set of 4 disks, with consideration that we only want to use our MinIO server as cold backup storage (at most be used as nightly backups). We can sacrifice some availability and reliability. Hetzner Storage Box have a snapshot option to make a daily snapshot of the whole box. If something were to happen with the Storage Box we can recreate the box with small downtime because no live services is using the buckets. For a different use case, you have to weigh your pros and cons of the setup.
Because one Storage Box is used for one server pool, in this setup there will be 4 PVCs that point to the same CIFS endpoint in the Storage Box, but at different directory. If we want to expand the capacity, we purchase new Storage Box and use it to create the second server pool, etc.
For requirement 3, It is better to use StatefulSet because the pod name and PVC name are predictable. If you have a StatefulSet called minio, the
first pod is going to be named minio-0 and the PVC template will create PVC called data-0. Next replica will have pod name minio-1 and PVC name data-1.
Since every PVC will mount to a CIFS-backed PV, it is okay to delete/recreate the PVC because the data itself will be stored in the CIFS endpoint.
So, we have plenty of option to create the PV. We can use StorageClass to generate 4 PVs (EC set per pool) for the same Storage Box. Or,
alternatively, we can create each PV manually. We are using StatefulSet so that new PV are going to be created automatically using the provided StorageClass.
For requirement 4, It is a lot easier to install a MinIO pool using Helm Chart. This is because for each pool you have to create StatefulSet with defined index. Combining two pools means we have to coordinate setup between two different pools of pods. It’s a lot easier to scale the configuration and setup if we use community available Helm Chart or Operator. However, in this setup, I’m going to use Helm Chart instead of Operator pattern. The reasoning is just we want to make sure we have a room of flexibility to set up the StorageClass. If we are going to use the Operator pattern, we are using a more Cloud Native approach where it’s easier to set up a MinIO instance, but we have less control on manually configuring the instance. I need this because we want to set up a backup endpoint, not highly available object storage buckets. Operator works best if you want to create multiple different MinIO endpoint/tenant for multiple projects. Like a dedicated project’s object storage endpoint.
For requirement 5, Internal service discovery is a natural feature of Kubernetes. A pod in a StatefulSet can have internal names like this:
minio-0.minio.svc.cluster.local. If we have service called minio that selects pods in a StatefulSet, we can refer to a specific pod
just by using <pod-name>.minio. In other words, if we use Kubernetes service resource, we can easily assign MinIO node index without having
to hack /etc/hosts of each MinIO node.
Considering all of these requirements, I found out that Bitnami have a perfect chart that we can use to install scalable distributed MinIO instance.
Implementation
Now that we have rough plan, we are going to start with the implementation details.
Installing CSI driver (instead of FlexVolume driver)
First problem that we need to tackle, is to use scalable StorageClass to provision all those PVs. I figured out that there exists a CSI driver for SMB. Hetzner Storage Boxes can be accessed using CIFS. On the other hand, SMB (Server Message Block) is basically a superset of CIFS. Or, you can think that CIFS is a kind of dialect of SMB. It is kind of similar of how there is an SQL standard, and then there is a PostgreSQL dialect or MySQL dialect, yet both should be compatible with SQL. So, I am guessing that this SMB CSI driver will work with Hetzner’s CIFS Storage Box. Well, we just have to try it.
They have an official repo here. The driver is installable with Helm chart. Compared with the previous post where we used FlexVolume driver, this is easier and scalable. Installing the chart in your cluster will make it available to the entire nodes and pods.
Installation instruction can be seen here, but I will copy paste for convenience here.
       helm repo add csi-driver-smb https://raw.githubusercontent.com/kubernetes-csi/csi-driver-smb/master/charts
helm install csi-driver-smb csi-driver-smb/csi-driver-smb --namespace kube-system
Now, we should be able to use CIFS-backed PVs
Creating SMB StorageClass
Since we are going to use StatefulSet, we hope we can create a StorageClass that can dynamically provision multiple PVC template and assign them PV with directory in our Hetzner Storage Box. From the docs here it seems this is the common usage. A sample of StorageClass can be like this:
       apiVersion: storage.k8s.io/v1
kind: StorageClass
metadata:
  name: hetzner-storage-box-minio
provisioner: smb.csi.k8s.io
parameters:
  source: '//<hetzner-storage-box>/backup/<target-directory>'
  csi.storage.k8s.io/node-stage-secret-name: 'cifs-secret-1'
  csi.storage.k8s.io/node-stage-secret-namespace: 'minio'
  createSubDir: 'true' # optional: create a sub dir for new volume
reclaimPolicy: Retain # only retain is supported
volumeBindingMode: Immediate
mountOptions:
  - dir_mode=0777
  - file_mode=0777
  - uid=1001
  - gid=1001
These are the explanation on some options above.
For the metadata.name we are using hetzner-storage-box-minio. It is worth noting that a StorageClass class is actually decoupled from a PV it creates.
When a certain PV is created by a StorageClass, the PV has no bussiness with the StorageClass again. In the future, if we want to expand
MinIO capacity, we purchase new Storage Box, then use the new parameters to create a StorageClass with the same name.
Old created PV will stay the same if not deleted. New PV will be created using the new parameter in the existing StorageClass.
That’s why metadata.name uses a generic unindexed name.
The parameters.source depends on your Hetzner Storage Box endpoint. For hetzner, its usually in the form of //<some id>.your-storagebox.de/backup.
But, we want to group the created PVs in a specific directory called <target-directory>. We also combined it with parameters.createSubDir: "true".
That means, if a new PV have an id pv-<some-hash>, the data inside the volume will be stored in the //<some id>.your-storagebox.de/backup/<target-directory>/pv-<some-hash>.
We just use this convention to make it more organized if we want to browse the content via SFTP.
The csi.storage.k8s.io/node-stage-secret-name: "cifs-secret-1" depends on the credentials of your Storage Box. We append index 1 to the secret name,
because when we scale, we have to have multiple Storage Boxes accessed at the same time, and all of them have different credentials.
We make it so that cifs-secret-1 refer to the first StorageBox, cifs-secret-2 refer to the second StorageBox, and so on. We create a new secret
credentials for every StorageBox we purchase to be used here.
The parameter csi.storage.k8s.io/node-stage-secret-namespace: "minio" is just the namespace where the secret resides.
For the mountOptions lists, notice that I set up uid=1001 and gid=1001. Same reason with the previous post. This is because the container
uses uid/gid 1001/1001 to run minio command. So we have to grant the filesystem permission with the same ids.
Installing MinIO chart in distributed mode
Bitnami chart I mentioned above made it super simple to setup distributed MinIO. They already uses StatefulSet and customizeable StorageClass.
Installation guide can be seen here, I present it here for convenience.
helm repo add bitnami https://charts.bitnami.com/bitnami
Before we install the chart, we need to customize the values.yaml for our use case.
       ---
mode: distributed
statefulset:
  replicaCount: 4
  zones: 1
persistence:
  storageClass: hetzner-storage-box-minio
  size: 250Gi
accessKey:
  password: <random string>
secretKey:
  password: <random and long string>
Let’s review the values declared here.
You need to specify mode: distributed so that Bitnami chart create scalable StatefulSet-based deployment with Erasure Code.
Because we want to use EC set of 4 disks, we specify statefulset.replicaCount: 4. There’s actually another options called statefulset.drivesPerNode.
But I don’t think it’s useful in this case. The number specified in drivesPerNode will determine the number of disks for each replica. So if you are using
EC set of 4 disks, but you are using replicaCount: 2 then you have to set drivesPerNode: 2.
The option statefulset.zones is analog to the server pool in the official documentation. Initially we set zones: 1. If the storage is full,
we expand the capacity by incrementing the zones (analog of adding a new homogenous pool) to zones: 2. StatefulSet will increment the replicas from
4 to 8 in this case. Then the StorageClass will create the new missing PVs based on currently set parameters (it should point to the new Storage Box).
For the persistence.storageClass we are going to always set it to hetzner-storage-box-minio, as we scale up. However, before every scale up process,
we delete the StorageClass and recreate it with the new parameter for the new Storage Box.
For the persistence.size, I’m not going to assume that it is expandable. Let’s say you purchase Storage Box with total capacity of 1 TB.
This is going to be used as 4 separate PVs. So, each of the volume will have around 250 GB. Since the MinIO docs said that the MinIO instance
in EC setup can withstand N/2 drives failures, then I’m going to assume that the usage capacity is between 250 GB to 500 GB for this kind of setup.
This can help you make a ballpark estimates. If your Kubernetes cluster have around 1 TB PVs currently in uses, then you need at least 4 Storage Box
with 1 TB storage each, if you want to backup all of those data to this MinIO instance. Since you have 4 Storage Box, you have 4 zones. If this is not enough,
you can expand the capacity gradually.
For the accessKey and secretKey just fill it with random string. Usually secretKey is very long, while accessKey is like randomly generated account name.
This values are going to be used for all the MinIO pods/nodes. This is the super user keys, so if you plan on using different credentials for different roles,
just create a new set of IAM keys using minio client CLI.
Then, we install the chart using the command below:
helm -n minio install minio bitnami/minio -f values.yaml
The chart actually creates a headless service. So if you are planning to use the instance inside the cluster only, you can just use the headless service to refer to the MinIO site. Otherwise, you need to setup Ingress that targets the headless service.
Expanding existing distributed MinIO instance
To expand the current capacity, first, provision a new Hetzner Storage Box with identical capacity with the current Storage Box.
Create the new Storage Box credentials as a new secret, incrementing the secret index. If this is your second Storage Box, you should have
cifs-secret-1 as credentials of your first box, then cifs-secret-2 as credentials of your new second box.
Next, delete the current StorageClass of hetzner-storage-box-minio (don’t worry, it won’t delete existing PV).
Create a new StorageClass with the same name, but now fill in with the parameters of your new Storage Box (and the new secret).
Final step, upgrade your helm release with the new parameters, incrementing the zone values (everything else is the same).
helm -n minio upgrade minio bitnami/minio -f new-values.yaml
Optionally, if for some reason you want to limit the MinIO pods to be run only in a group of server nodes that you already labeled, this helm chart also provides options to specify affinities:
       # include this in the values.yaml
affinity: |
  nodeAffinity:
      requiredDuringSchedulingIgnoredDuringExecution:
        nodeSelectorTerms:
        - matchExpressions:
          - key: label-key-you-defined
            operator: In
            values:
            - label-values-you-defined
Replacing existing standalone MinIO instance with distributed MinIO
You can’t reuse volumes of non-EC setup with EC setup, or EC setup with different EC set. The best way I can think of to tackle this problem is to just create a new distributed MinIO instance, then copy recursively from one bucket to the other bucket in the new instance.
It is also worth noting that MinIO deployment doesn’t care about the internet facing DNS hostname.
So if you have standalone MinIO instance in https://minio.mysite.org, you can create a new distributed instance in https://new.minio.mysite.org,
copy the data over, and then switch over the ingress of https://minio.mysite.org to use the new distributed instance. You can create a simple Kubernetes
Job that iterates all the buckets and copy over the content to the new instance when you migrate to a new storage setup.
This trick can also be applied if you wish to change the underlying EC set to a different more redundant set config.
The final architecture diagram of StatefulSet-based distributed MinIO instance
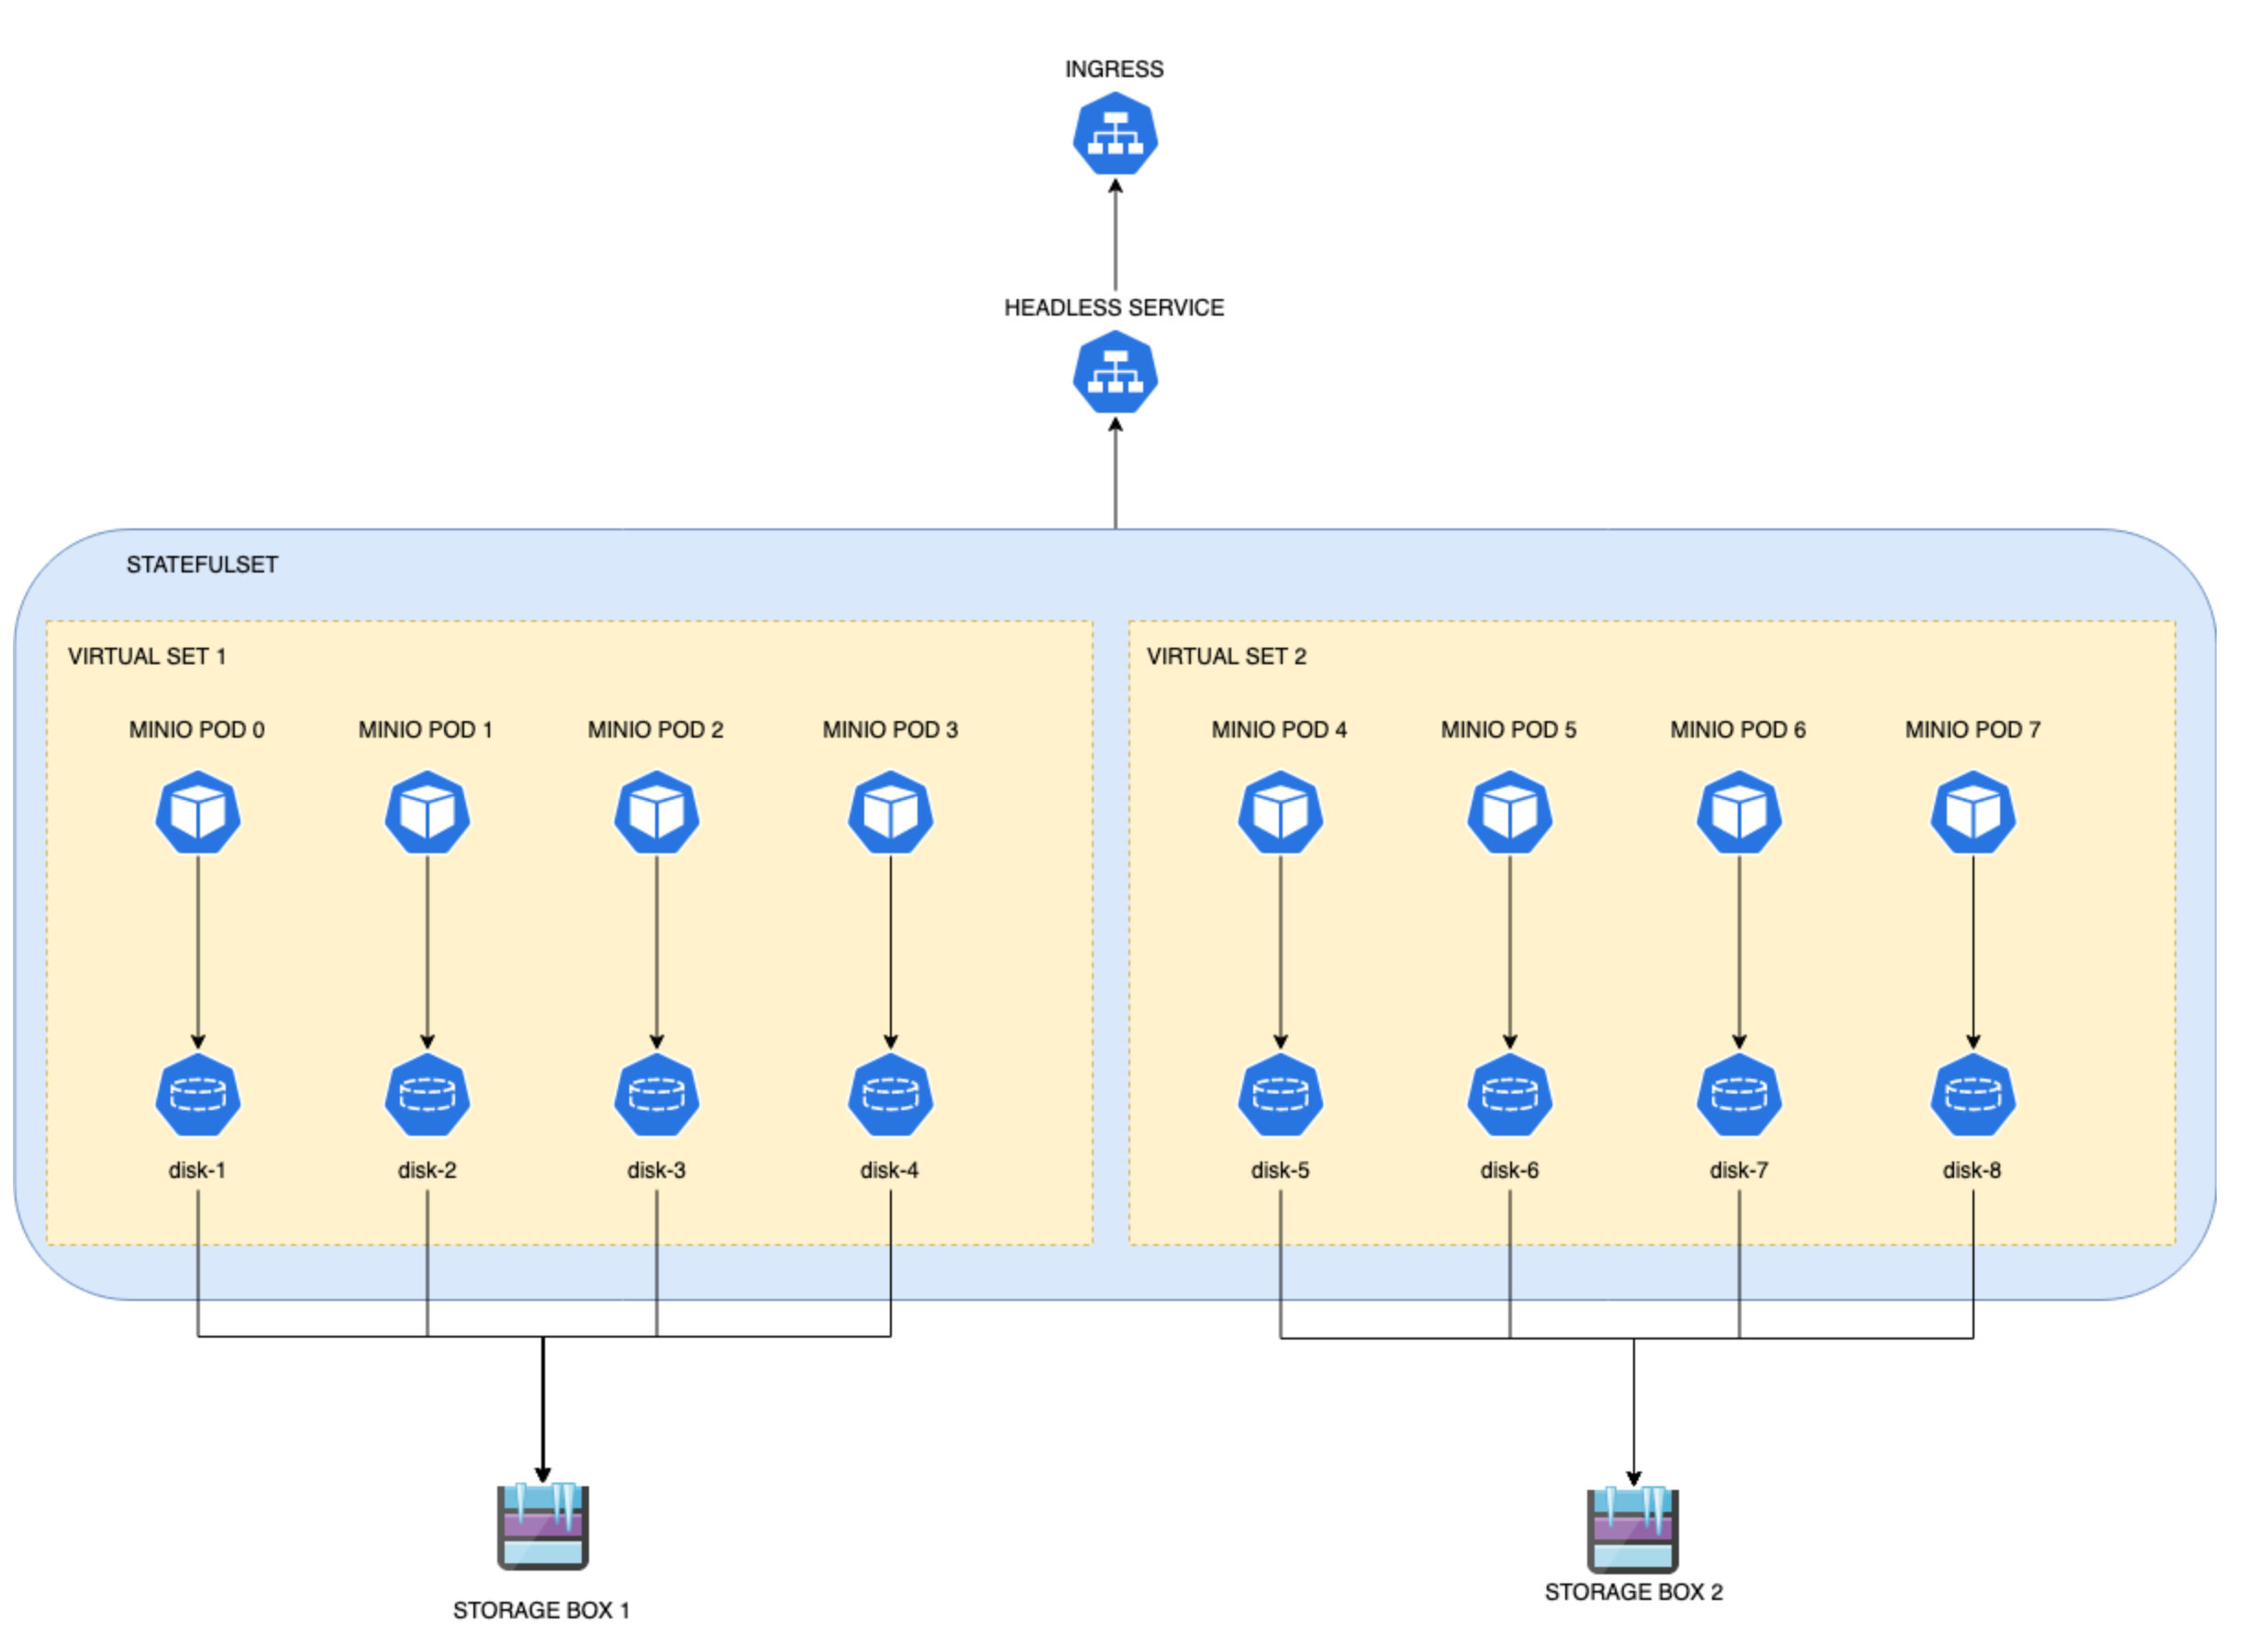
The final diagram is not so different with the previous one, but now it is annotated with some Kubernetes resources.
The noticeable difference is that the two server pool (two sets of Storage Boxes) is now managed by one single StatefulSet.
So actually, one StatefulSet manages the whole pods from pod 0 to pod 7. Each pod serving one MinIO node from one disk.
The minio command line recognize it as two pools of EC set 4 with the help of Bitnami Helm Charts. Without Bitnami
Helm chart, we have to create two StatefulSet, one for each server pool (or EC set).
Bitnami helm chart also makes it easy to expand the size, because the minio server command is adjusted from the parameters.
If we were to deploy it manually using StatefulSet, then we have to delete and recreate the StatefulSet to adjust the minio command
to add the new pool.
This means the orange boundaries in the diagram above is only virtual. We have logically two server pools, each using it’s own Storage Box scattered over 4 PVs. But actually each of the pods is handled by just one StatefulSet. New PVCs/PVs are created with the parameters from the new StorageClass. Old PVs will stay the same.
One disadvantage of this setup is that if one of the pool is down, for example the backing Storage Box is down, then it is possible that the MinIO instance can’t function. But for us, this is an acceptable trade off because Storage Box is cheap, and it has snapshots functionality.
Currently, in Hetzner we can’t easily provision new storage from Kubernetes API. Hetzner have a product called Hetzner volume, which can be thought of as an Elastic Block Volume. But, in order to use it, you have to mount the volume to the node. So if your pod moves, the volumes can’t move automatically. Unless you set up a two tier connection, you set up all the volumes to one dedicated node that serves as a network storage endpoint. However, I believe this will have significant bottleneck (although I haven’t tried it yet), because Hetzner Volume is already a network storage in the first place. If we can have Hetzner Volume accessible via Kubernetes CSI (as block device), then it’s possible to scale up easily.
As a quick comparison, this is the current matrix difference of 1 TB storage between Hetzner Storage Box and Hetzner Volume
| Feature | Storage Box | Volume |
|---|---|---|
| Monthly Price (1TB) | EUR 9.08 | EUR 47.10 |
| Interface | CIFS/SSH/SFTP/RSYNC | Block Device |
| Backup Functionality | Yes with snapshots | Not possible to make snapshot |
| High Availability | Just a simple CIFS storage | Triple replication, fast SSD, and HA |
| Can be reformatted | No | Yes |
| Maximum Concurrent Connections | 10 network connection | 1 attached node, not tested if the node is accessed by multiple pods |
Now, let’s consider my current use case. I only want to have MinIO storage backend to be used to send Longhorn Volume backups, probably daily. It is permissible for this MinIO instance to have some downtime, because user won’t interact directly with this MinIO instance. More importantly, since one Kubernetes cluster uses maybe more than 1 TB of PersistentVolume, we want to have a reliable and affordable temporary backup store when we do our cluster wide maintenance (in case something goes wrong). There will be many PVs, but MinIO will help throttle the backup schedule so that there will be at most 4 concurrent connection to the CIFS storage box. This is more than enough, especially if you consider the significant price difference per TB. Almost 4 times the difference.
Let’s talk about expandability a little bit more. Suppose that I have 1 TB Longhorn snapshots of PersistentVolume. To send it to MinIO-backed storage, I had to provision 4 Storage Box of 1 TB, which costs around EUR 36.32. I assume that each Storage Box will support maximum capacity of 500 GB from the MinIO instance (assuming it can tolerate failures of N/2 disks). If that’s not the case, then every object sent to MinIO is spread up into 4 different StorageBox. I think 1 TB strikes as the balance between affordability and redundancy. It’s easier to manage 4 instances of 1 TB boxes than 40 instances of 100 GB boxes for our small company. It’s also cheaper that way because 100 GB box is around EUR 3.33 each.
Now compare with the same setup, but using Hetzner Volume. We still need to provision 4 TB volume, so the price difference is very steep. I think it is much more reasonable to just use standalone MinIO setup (without EC) if you plan on using Hetzner Volume. The only downside is, you can’t make a volume snapshot. But this is not a problem if what you want to set up is a High Availability object store where it doesn’t matter if the object inside gets deleted over time. For example, if the use case is to store temporary calculation results or byproduct.
What happens if we compare it with existing S3 instance in AWS? Well, it might be difficult to compare it directly because AWS S3 is priced by usage. You might be even billed for a GET requests. For a small company this might be a headache to compute and not straightforward. So Hetzner pricing makes more sense. Roughly speaking, based on this pricing page, for frequently accessed data, if we have 1 TB of data just sitting in S3, the cost is only USD 23. However, what makes it difficult is that S3 calculates the cost of PUT/GET/SELECT requests. Longhorn volumes are stored as blocks, so there will be many blocks, hence many PUT requests, daily. So, unless we are very sure on how much traffic we are dealing with, the pricing can blew up. Not to mention, if our server is in Hetzner, but the S3 instance is in AWS, then we also had to calculate data transfer costs, daily.
So, I think this is the best setup I can think of for my backup use case.
How to tests the setup
Currently, I haven’t yet tested the performance benchmark of the setup. What I did tests, is just to see if the distributed MinIO setup is vertically scalable. In the official documentation it is not clear that adding a new server pool corresponds to increase the total GB capacity of the object storage. So, we are going to test that.
- Set up initial distributed MinIO instance
We want to see if expanding increase total capacity, not just redundancy. So we only provision the SMB CSI StorageClass to create 1 GB non-expandable PV. We are using EC set 4, with one disk per replicas.
- Send Longhorn Backup
Sending Longhorn Backup with less than 1 GB size work flawlessly. So I think the throughput is enough without hiccups. Sending Longhorn Backup with more than 1 GB size stops in the middle. If I check the disk sizes of all the 4 PVs, it is all used up. However, the MinIO instance is still up and running for read requests. It’s just that the Longhorn Backup now stucks with error message.
- Expanding the pool
By increasing the zones parameters, we increase the number of replicas. Since I’m using the same Storage Box, I don’t have to change
the StorageClass. Longhorn backup job doesn’t restart automatically, so I have to run backup again. This time it succeeds.
Note that I can’t test further more by just increasing the zones, because then the Storage Box is accessed by more than 10 concurrent
network connections. To test bigger backups, I have to recreate the instance and use bigger disk size per replicas.
- Testing pod/disk downtime
We can simulate disk downtime by manually downscaling the StatefulSet. In the initial setup, we used 4 replicas. We can downscale to two replicas, and expect GET requests to still be working. It indeed works. However if we downscale to one replica, we can still access the web browser but it says it has insufficient healthy nodes. This is because at most it can tolerate N/2 disks failures.
We can also simulate disk rebuild by deleting two PVs. Then we scale back to 4 replicas. Now the new PVs must have redundant content after the disk is healed. You can check the information using:
       mc admin info <alias-name>
mc admin heal <alias-name>
If the display shows all green, then it successfully rebuilt.
Conclusion
- We use SMB CSI driver so that we can scale up Storage Boxes easily
- We demonstrated distributed MinIO instance with Erasure Code installation using Bitnami Helm Chart
- We showed how to expand the capacity of this distributed MinIO instance
By the way, I haven’t done performance benchmark in this post. Maybe at a later post if I have time.