Published
- 4 min read
Fixing broken Nix installation in MacOS Sequoia
Several days after upgrading to MacOS Sequoia, I noticed that some of my basic CLI were not detected. After checking terminal, my prompt doesn’t show my usual Starship prompt, but rather the plain ZSH prompt. This happens after some days without rebooting my laptop, so I’m not entirely sure why it can happen without rebooting.
A quick check in the terminal with command -v nix shows that nix wasn’t found. Nix darwin profile also wasn’t found.
So obviously any Nix based hook doesn’t work. So I check /nix directory which is the Nix Store. It was empty.
In MacOS, I think after they began introducing APFS (Apple File Systems), the only way to have Nix Store is to make
a separate APFS volume and mount it into /nix. So the problem is not because the content of /nix were suddenly deleted.
It was just not mounted.
Checking the Nix Store Volume
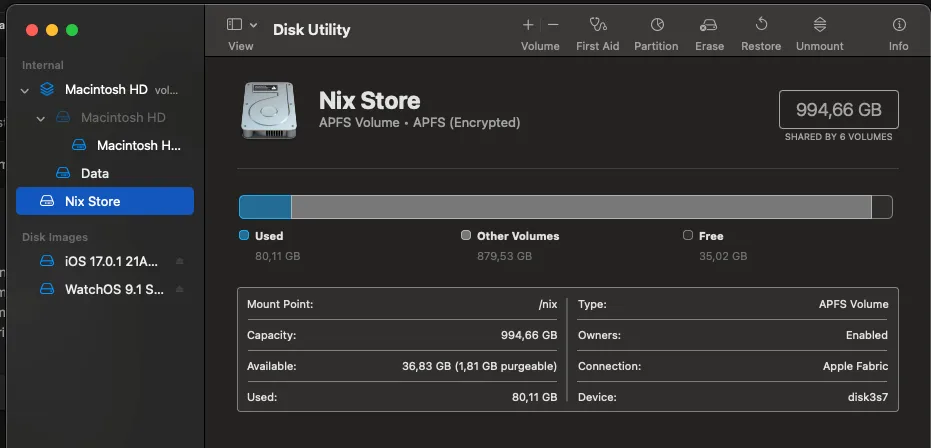
To check if the volume exists and not suddenly gone. I used Disk Utility from Spotlight. There I can see that the volume exists.

In the screenshot above, you can see the mount point set to /nix. This is after the fix, which is the normal state.
However, when the issue happened, it was mounted to /Volumes/Nix Store.
There is no interface to set the mount point from Disk Utility, as far as I know. So I unmount the volume and tried to mount via terminal.
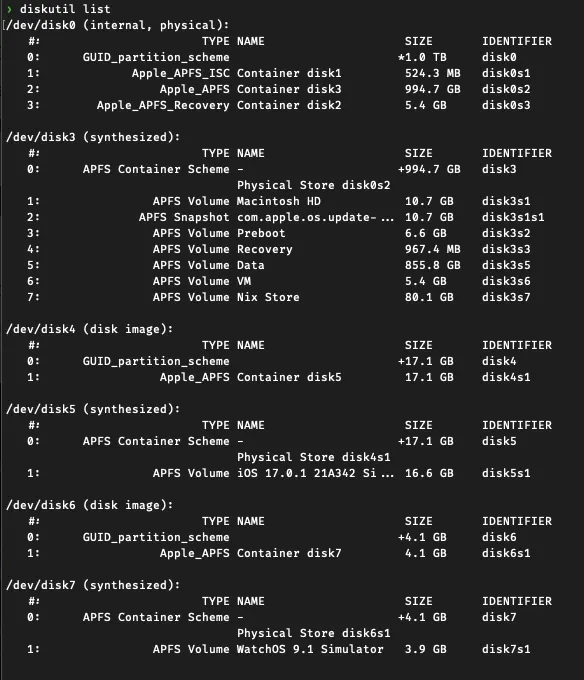
To see the lists of disks and volumes:
diskutil list

The above output shows that my Nix Store volume is on partition 7 of disk 3, or disk3s7 as the identifier
My next attempt is to try to mount it using diskutil
sudo diskutil mount -mountPoint /nix /dev/disk3s7
But this gave me warning that the partition were locked (because it is using APFS). Ok then, I unlock it using diskutil again.
sudo diskutil apfs unlockVolume /dev/disk3s7
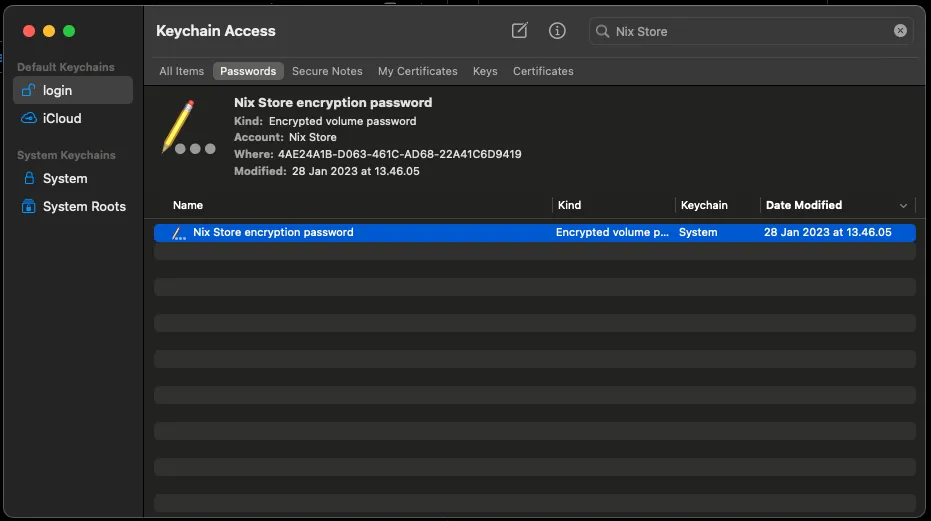
It will request an unlock key. Where to get it? The answer is on your keychain.app.
Open your Keychain and search for Nix Store.

You can then right click and choose Get info in order to see the encryption password. It will require you to input your administrative password.
You then give this encryption key to the terminal prompt when asked about the key.
If you are lucky and integrated security CLI with touch ID, then you can skip the entire Keychain lookup, because the CLI
will look it up for you. You just need to gave permission using your touch ID.
Now here’s the stupid thing. Once you unlock the volume, turns out it is immediately mounted.
To where???
To the current mount point, which is /Volumes/Nix Store. You can’t unlock and then mount it manually to /nix, because
it just immediately mounted. At least I don’t have any way to do that.
Mounting Nix Store at boot time
So we are going to use the old fashioned Unix-way. Mount the volume during boot time.
First we need to tell MacOS that it is okay to mount the disk at boot time to /nix location.
This configuration is located in /etc/synthetic.conf. I have two entries like below (create if it doesn’t exists):
       nix
run     private/var/run
Then we put our mount command in /etc/fstab. But in MacOS, it was advised to edit it using vifs CLI.
To mount it, get the device UUID first.
If you open the previous Keychain entries, the device UUID is the value of Where attribute.
Alternatively, just use diskutil to find the UUID
diskutil info disk3s7 | grep 'Volume UUID'
Now use sudo vifs and add entry like this:
UUID=<your Nix Store device UUID> /nix apfs rw
Then reboot, your Nix installation should work as usual.
Remarks
You can view the content of the fstab (File System table) in /etc/fstab. Like using cat /etc/fstab command, rather than sudo vifs if you only want to see the content.
In general if you found that your /nix mount entry missing again (probably after OS update/upgrade).
You can do the walkthrough above.